
Showing posts with label how. Show all posts
Showing posts with label how. Show all posts
Thursday, December 11, 2014
How To Find IMEI Number Of Your iPhone
How To Find IMEI Number Of Tour iPhone :
havel covered two different methods you can use in order to find your iPhone IMEI (International Mobile Station Equipment Identity) number. IMEI is used by cellphone networks in order to identify devices. If someone steal you iPhone, all you have to do is contact your network provider and tell them to block the phone using the IMEI number.


Step 2: From below tabs select Keypad.
Step 3: Now type in following code *#06# and tap on Dial.
Step 4: On your screen you should see your IMEI number.
havel covered two different methods you can use in order to find your iPhone IMEI (International Mobile Station Equipment Identity) number. IMEI is used by cellphone networks in order to identify devices. If someone steal you iPhone, all you have to do is contact your network provider and tell them to block the phone using the IMEI number.
There are few ways you can find your IMEI number in iPhone, and in this tutorial I will show you two of them.
From iOS menu
Step 1: From your Springboard tap on Settings.
Step 2: From Settings, tap on General option.
Step 3: Now tap on About located at the top.
Step 4: Scroll the options all the way down and around the middle you should see your IMEI number (its right below Bluetooth).
Using Dial
Step 1: From your Springboard tap on Phone.Step 2: From below tabs select Keypad.
Step 3: Now type in following code *#06# and tap on Dial.
Step 4: On your screen you should see your IMEI number.
Thursday, November 20, 2014
How to Transform any speakers into a wireless Spotify music framework utilizing an Android gadget
Spotify simply upgraded its Android applications Spotify Connect feature to let the application demonstration as a remote to control different gadgets, devices playing Spotify tunes. So, You can snare your tablet to your home speakers and control the jams with your cell phone. The Spotify change log in Google Play states the following: Spotify Music app So, You guys want to utilize Spotify Connect on any speakers? Just Plug your smartphone or tablet into both a charger and your speakers.
Log into the same Spotify account on an alternate device, and use it as a remote simply. If you need quality sound over whats accessible from Bluetooth speakers and you have two gadgets (devices) with same Spotify account regiestered, Its an awesome upgrade.
You can transform any speakers into a wireless Spotify music framework utilizing an Android gadget.
Wednesday, November 19, 2014
HTC One X How To Change Clock Widget and Location
Maybe you feel Clock Widget on your HTC X device does not satisfactory. Or you want to see the weather report, but the clock widget does not fit menunjuka city. By default, the Clock widget displays the time and weather in your current location. But there still could change:
In order to change location of clock widget on HTC One X Android smartphone, you have to follow some steps as listed below:Steps:
Read More..
In order to change location of clock widget on HTC One X Android smartphone, you have to follow some steps as listed below:Steps:
- Go to Home Screen on your HTC One X Android smartphone
- Navigate to the Clock Widget on your Android phone
- Now you have to tap and hold the Clock Widget for few seconds
- Then you have to drag it to “Edit” button
- You will now see a list of cities appearing on the Lcd
- You are required to navigate to the name of cities and select the desire city
- Incase if you are not able to view the desire city name
- You have to tap on “+” button in order to bring up the search bar
- In the search box you have to enter the desire name of your city to be searched for
- Now you have to select the searched city name
- Finally you have to tap on “Done” button to apply the changes
- You have successfully done!
- On the World Clock tab, tap
 > Local time settings.
 - Clear Automatic date & time and Automatic time zone, and then set the time zone, date, and time as required.
Saturday, November 15, 2014
How To Hard Reset Nokia Lumia 520
1.Turn off your lumia 520 phone.
2.press and hold the volume down and camera keys..
3.press and hold the power key
4.when you feel the phone vibretes .release the power key.but keep pressing the volume down and camera keys.until the phone reboots.
all data will be lost ! it will 100% work

2.press and hold the volume down and camera keys..
3.press and hold the power key
4.when you feel the phone vibretes .release the power key.but keep pressing the volume down and camera keys.until the phone reboots.
all data will be lost ! it will 100% work
Sunday, November 2, 2014
How to fix your Android phone
The demand for Android phone has always been high, but there could be technical hitches. Need to make an urgent business call or an emergency call and suddenly your mobile does not respond, that’s the last you want to face. Before you begin with the fixing phone, do not forget to take a backup of the files. This is an important thing to remember since there is always a chance to lose the phone’s memory and lose valuable data. To fix the issues with your android mobile there are various methods and it includes -
One of the most commonly followed way of fixing the technical hitch primarily starts with removing the battery of the phone and putting it back again. This is one of the simplest solutions followed by most mobile users or service centers. One of the reasons why this method is followed is by taking the battery out; the user is forcing the device to reset by itself. And by fixing the battery once again you are loading the device.
If the technical hitch doesn’t stop there, it could probably be a software issue. Software updates can be a major reason to fix a technical issue. One of the important factors to remember while going in for a software update would be charging your phone completely and ensuring an internet connection. Because the updating process could be time consuming and it may drain the battery.
The phone updates will be available in the phone settings and upon reset updates will take place. In case if the user is unable to reset the updates, he can connect the device to a computer and follow instruction and do the required software updates. In spite of a software update if the phone still does not work, the user may try out resetting the factory settings. By setting the phone in the factory mode, you will gain back the basic setting of your device.
Before trying the factory setting, the user needs to ensure that the data backup is taken. By setting the factory resetting, the phone memory is erased and all stored data will be lost. The device will be rebooting after the resetting process. The process brings back the original setting of the device or rather the factory state. These are the immediate steps to recover your smartphone and the process that can be followed in case the user faces a technical glitch.
How to Master Reset or Hard Reset a Sony Ps3
reset to factory settings

Hard Reset procedure for the PS3 Be sure to backup your settings/games saves by doing a System > Backup on your PS3 or you may lose your game saves! Also, this is a last resort procedure prior to exchanging/returning to sony.
1. Power Off the PS3 via the power switch in back and power back on w/switch.
2. Hold Power Button on the Front until you hear 3 beeps.
3. Then go through the initial setup and then run a full Format via System > Format. (will take approx 3 1/1 hours). You may need to have our AV cables ready if your using HDMI (in case HDMI isnt detected after initial reset).
4. Restore your backup you made prior to doing factory/hard reset (optional, if you created a backup).
Hopefully this will solve your freezing problems.Problems/symptons that this appears to have resolved:
-freezing when doing anything
-no harddrive activity
-freezing when trying to use onboard keyboard or bringing up keyboard
-game/movie disc freezes system
Friday, October 31, 2014
Hard Reset Karbonn Smart Tab 1
Follow these steps to hard reset karbonn Smart Tab1 with a simple method. All data will be deleted from The Tab memory. But no effect happen simcard contacts an mmc card. ofter hard reset your phone looks like New as from company. Here is steps to Hard reset ,factory reset Karbonn Smart Tab1.

Hard Reset Karbonn Smart Tab1
1. Switch off your Tab.
2. Press Volume key Down & POWER key, Hold These Two keys 3 seconds.
3. Ofter 3 seconds Release Power Key and keep holding the Volume down key until you see Recovery menu.
4. Now choose option wipe data.
5. For moving up and down use volume keys to select wipe data.
6. Then Press Button as ok to confirm...
7. Reboot Tab1.
I hope this post ..How To Hard Reset Karbonn Smart Tab1.. Helps you To solve your karbon smart Tab1 problem..
2. Press Volume key Down & POWER key, Hold These Two keys 3 seconds.
3. Ofter 3 seconds Release Power Key and keep holding the Volume down key until you see Recovery menu.
5. For moving up and down use volume keys to select wipe data.
6. Then Press Button as ok to confirm...
7. Reboot Tab1.
I hope this post ..How To Hard Reset Karbonn Smart Tab1.. Helps you To solve your karbon smart Tab1 problem..
Watch this Tutorial:
Wednesday, October 29, 2014
How to Hard Reset HTC Droid Eris
HTC Droid Eris Hard Reset
Perform a hard reset on your HTC Droid Eris. These steps will clear all data and settings off the device.1. With the phone turned off, press and hold the Volume Down and Send buttons.
2. Press the Power button.
3. Follow the instructions to complete the hard reset.
Sunday, October 26, 2014
How to flash Clockwork Mod Touch Recovery 6 0 1 2 for Galaxy S3 I9300

For make this update, please notes this tutorial could only have applied on rooted Samsung Galaxy S3 device. When you will install this recovery, you’ll be able to use custom ROMs firmware.
For be able to guide you need quick pre requisites to follow:
Warning
- The instructions in this guide are intended for use with Galaxy S3 GT I9300 smartphone International version.
- Applying these instructions on another device or model may produce undesired outcomes.
- The information in this guide is provided for instructional and educational purposes only. There is no guarantee that these instructions will work under your specific and unique circumstances.
- Use these instructions at your own risk. We shall not hold any responsibility or liability for whatever happens to you or your device arising from your use of the info in this guide.
- Read and understand the whole guide first before actually performing the instructions.
- This custom recovery image is only for Galaxy S3 GT I9300 smartphone International version, and we will apply only for this model. If you apply on the network / boot loader locked devices.
For SMS-you can use SMS backup and restore tutorial;
For contacts, you can use Sync with your Gmail tutorial;
For Call Logs, use Download Call Logs Backup & Restore App For Android;
For all Images, Video, Files, Songs- Should Copy to internal/ External SD card;
For save your APN and MMS Settings -“Applications > Settings > Wireless and Network > Mobile Networks > Access Point Names” or you can use this tutorial for save your internet settings.
- Check your battery on your phone and charge it at a minimum is not less than 40%.
- Go to access this path “Settings > Applications > Development > USB debugging”, and there verify if you’ve enable the USB Debugging, if not enable it.
- Turn off all the antivirus protection and firewall tools, these can interrupt the proccess of firmware update.
- Check if your device is rooted or not, for make this, please download the “Root Checker” application from here.
- Verify again if you made all this prerequisites above mentioned and now you can forward the next instructions where we have detailed a guide on:
Guide to Install Custom Recovery Image in Samsung Galaxy S3 I9300:
- Download the Latest Clockwork Mod Touch Recovery 6.0.1.2 Image.
- Download Odin from here to your computer.
- Connect your phone on your computer with your original USB cable.
- Place this recovery file on your external SD Card, not in internal memory
- Now disconnect your phone from your computer and turn off the device, to enter in the Download Mode.
- To enter on Download mode, please holding the Volume Down button+ the Home Key button which it is in the middle. Note: If your phone starts in “Normal Mode” retry the process to enter in Download Mode.
- Open Odin app, from your computer, and connect your device on “Download Mode”. Now check if the ID: COM section in Odin becomes Blue that indicating drivers have been successfully installed.
- Click on “PDA” to select “CF-Root-SGS3-v6.4.tar” file.
- Press “Start” after the file was selected to start the process of custom recovery installation.
The device will restart, and the home screen will be displayed on your device, now you can disconnect your phone to the computer.
Attention Note: If your Samsung Galaxy S III doesn’t turn ON(just in a rare case) or say gets stuck on the Samsung Galaxy Logo, in this case you need to long press the power button to power off the device, or re insert the battery to start the process from the begin.
Wednesday, October 15, 2014
How to Transfer Files Using Media Transfer Mode Via Wi Fi on Sony Xperia Z2 Tablet
 Transferring files in Sony Xperia Z2 Tablet is now made easy by using the Media Transfer Mode. You can easily transfer files between your device and other MTP compatible devices such as computer, using a Wi-Fi connection. But before you can transfer files wirelessly, you will need to pair both devices.
Note: You will need a Wi-Fi enabled devices that supports Media transfer such as a computer running Microsoft, Windows Vista orWindows 7.
To pair your device with the computer:
- Check if the media transfer mode of your device is enabled. It is normally enabled by default.
- Using the USB cable, connect your device to a computer.
- On your computer, once the name of your device appear, click on Network Configuration and just follow the steps on how to pair the computer.
- After pairing, safely disconnect your device from your computer.
These steps will work only on Windows 7 OS and the computer is connected to the Wi-Fi Access point via network cable.
To connect paired devices wirelessly in Media Transfer Mode:
- First things first, check if the media transfer mode is enabled.
- On your Home Lcd, tap on the Menu icon.
- Select Settings > Xperia > USB connectivity.
- Then tap the paired device that you want to connect to under Trusted devices.
- Tap connect.
If you want to disconnect, just tap on the paired device and tap Disconnect.
If you want to remove the paired device, tap on the paired device you want to remove and select Forget.
Sunday, October 5, 2014
How to Factory Reset Hard Reset iPhone 5S
 iPhone 5S is the latest iPhone model from Apple. Restoring the default settings or factory reset your iPhone 5S will delete all your saved files. It is recommended to backup your important files on your computer before attempting to reset your device.
Why do we need to reset the device? We have our own reasons why we factory reset our device. Maybe we want to delete all the files and restore the device to its original state. It could also be the device may be malfunctioning or so slow and it needs to be reset.
Step 1. On your iPhone, go to "Settings".
Step 2. Select "General" option.
Step 3. On the bottom of the Lcd, tap "Reset".
Step 4. You will be seeing a list of things which you can reset. If you want to reset all the content, select "Erase All Content and Settings".
Step 5. Tap "Yes" to confirm the action.
Now, you just need to wait while your iPhone 5S is wiping all datas or files on your device. In a short while your device will be good as new.
In case your iPhone 5S is unresponsive or frozen, you may need to hard reset your device. Press and hold the "Power Button" and the "Home Key Button" at the same time for at least ten seconds until the Apple logo appears.
Friday, September 26, 2014
How to Screen Mirror Sony Xperia Z2 to Show the Screen on a TV
The Screen Mirroring will allow you to show the Lcd of your device on a TV or other large display without using a cable connections. It uses the Wi-Fi Direct technology that create a wireless connection between two devices. You can also use this feature to listen to music from your phone via the TVs speakers.
Warning: Your TV must support Lcd mirroring based on Wi-Fi CERTIFIED Miracast™ for thenfunctionality described above to work. If your TV does not support Lcd mirroring, you need to purchase a wireless display adapter separately.
Warning: When using Lcd mirroring, the image quality may sometimes be negatively impacted if there is interference from other Wi-Fi® networks.
How to mirror the Lcd of your phone on a TV:
1. First you need to turn on the Lcd mirroring function on your TV. Just follow the instructions in the User Guide of your TV.
2. From your Home Lcd, tap on the .
.
3. Select on Settings, and tap Xperia™.
4. Choose Screen mirroring.
5. Tap to turn on the Screen mirroring and select a device.
Warning: When using Lcd mirroring, do not cover the Wi-Fi antenna area of your device.
Read More..
Warning: Your TV must support Lcd mirroring based on Wi-Fi CERTIFIED Miracast™ for thenfunctionality described above to work. If your TV does not support Lcd mirroring, you need to purchase a wireless display adapter separately.
Warning: When using Lcd mirroring, the image quality may sometimes be negatively impacted if there is interference from other Wi-Fi® networks.
How to mirror the Lcd of your phone on a TV:
1. First you need to turn on the Lcd mirroring function on your TV. Just follow the instructions in the User Guide of your TV.
2. From your Home Lcd, tap on the
.3. Select on Settings, and tap Xperia™.
4. Choose Screen mirroring.
5. Tap to turn on the Screen mirroring and select a device.
Warning: When using Lcd mirroring, do not cover the Wi-Fi antenna area of your device.
Tuesday, September 23, 2014
How To Repair Samsung Galaxy S I9000 imei Guide
First Method:
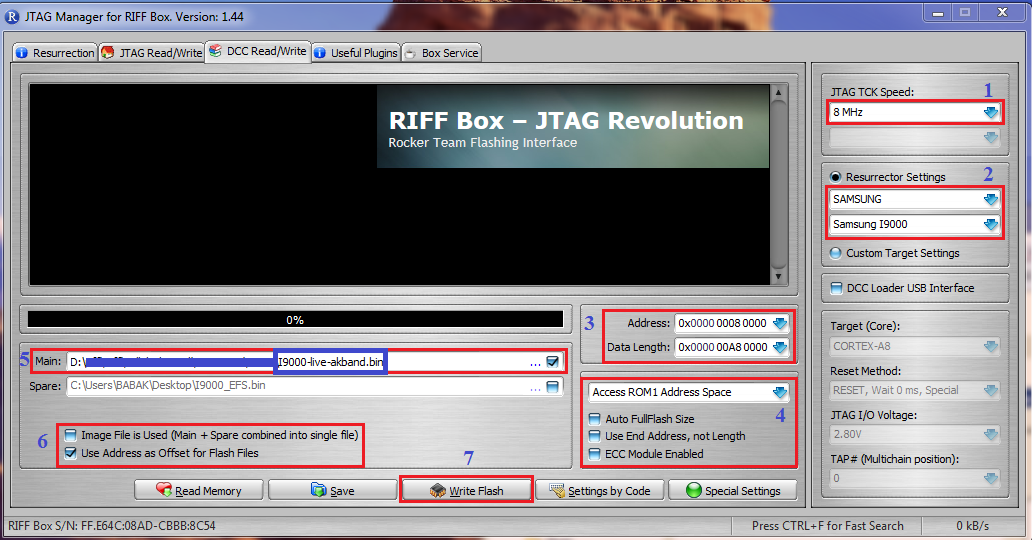
Guide:
1-Select "Speed"
2-Select "I9000" Model
3-Set "Start Address" "Data Length"
4-Uncheck 3 option...Select "Rom1"
5-Open "Full Dump file" in "Main" Window
6-Select "Use Adress as Offset xxxxxx"
7-Press "write"
After Finish,Please Check Phone,if Imei Back to "0044xxxxxx"....Your Problem Solved...
Secound Method :
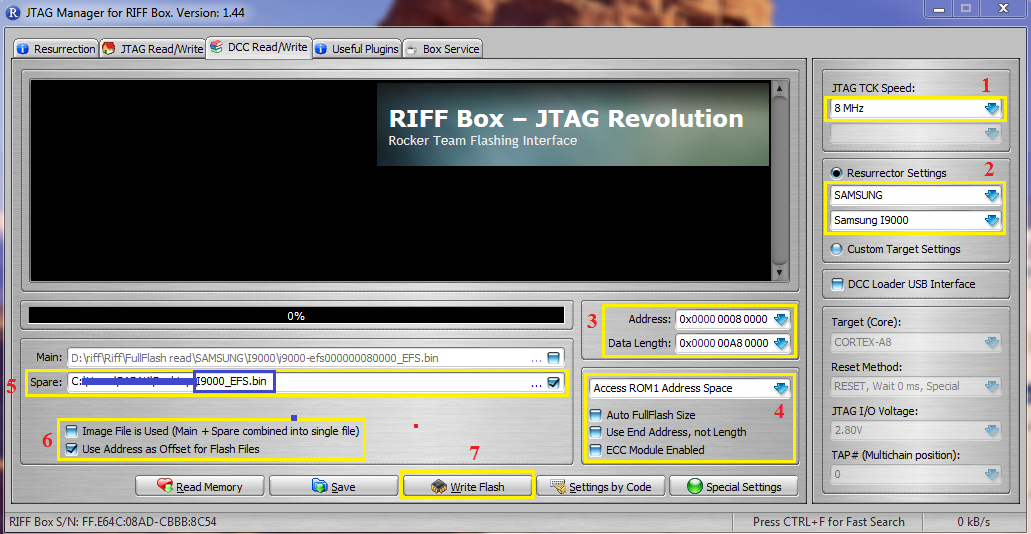
Guide:
1-Select "Speed"
2-Select "I9000" Model
3-Set "Start Address" "Data Length"
4-Uncheck 3 option...Select "Rom1"
5-Open "I9000_EFS.bin" in "Spare" Window
6-Select "Use Adress as Offset xxxxxx"
7-Press "write"
Download "I9000_EFS.bin" From Here:
https://hotfile.com/dl/174851499/35e...0_EFS.rar.html
Third Method:
Please Open "Samsung I9000-Like Full Flash Image Files " in "Useful Plugin Tab"
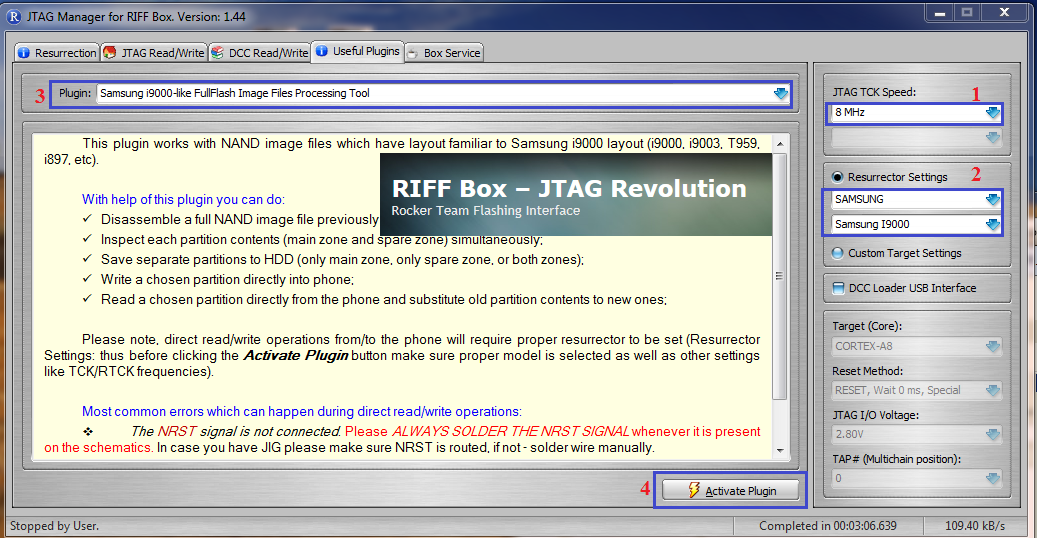
Then :
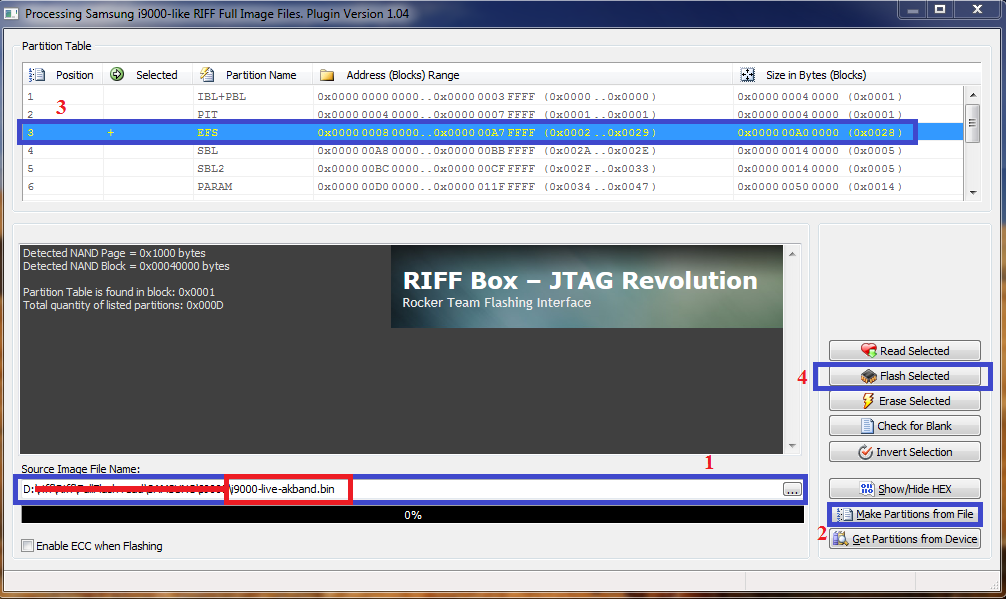
Guide:
1-Open "Full Dump File" in "Source Image File Name" Window
2-Press "Make Partition From File"
3-Double click On Partition 3...."This is EFS Partition"
4-Press "Flash Selected
Enjoy
Guide:
1-Select "Speed"
2-Select "I9000" Model
3-Set "Start Address" "Data Length"
4-Uncheck 3 option...Select "Rom1"
5-Open "Full Dump file" in "Main" Window
6-Select "Use Adress as Offset xxxxxx"
7-Press "write"
After Finish,Please Check Phone,if Imei Back to "0044xxxxxx"....Your Problem Solved...
Secound Method :
Guide:
1-Select "Speed"
2-Select "I9000" Model
3-Set "Start Address" "Data Length"
4-Uncheck 3 option...Select "Rom1"
5-Open "I9000_EFS.bin" in "Spare" Window
6-Select "Use Adress as Offset xxxxxx"
7-Press "write"
Download "I9000_EFS.bin" From Here:
https://hotfile.com/dl/174851499/35e...0_EFS.rar.html
Third Method:
Please Open "Samsung I9000-Like Full Flash Image Files " in "Useful Plugin Tab"
Then :
Guide:
1-Open "Full Dump File" in "Source Image File Name" Window
2-Press "Make Partition From File"
3-Double click On Partition 3...."This is EFS Partition"
4-Press "Flash Selected
Enjoy
Monday, September 22, 2014
How to Root Samsung Galaxy Star Pro S7262 Using Android 4 1 2 Jelly Bean Firmware and Install CWM Recovery
Samsung has already released the Android 4.1.2 Jelly Bean update with firmware build number S7262XXUAMK5 for the Galaxy Star Pro with dual SIM card slot (GT-S7262). The new official firmware is now available as an Over-The-Air (OTA) update as well as through Samsung KIES.
Firmware details
PDA: S7262XXUAMK5
CSC: S7262ODDAMK2
MODEM: S7262XXUAMK2
Version: Android 4.1.2
Build date: Nov 23, 2013
Regions: India, Nepal, Sri Lanka, Bangladesh
Samsung Galaxy Star Pro S7262 users who missed the OTA update notification or unable to access the update over Samsung KIES, can now download and install the same manually using our step-by-step guide.
Pre-requisites
1. Install USB Drivers for Samsung Galaxy Star Pro on the computer.
2. Enable USB Debugging Mode on the phone by navigating to Settings >> Developer Options.
3. Make a backup of all your important data before following the guide.
4. The Galaxy Star Pro should be factory unlocked and not locked to any particular carrier.
5. Ensure the battery of the phone is charged more than 80 percent.
6. The Android 4.1.2 XXUAMK5 Jelly Bean firmware is compatible only with the Samsung Galaxy Star Pro (GT-S7262). Applying this to any incorrect variant might brick the device. Verify the model number of the Galaxy Star Pro by navigating to Settings >> About Phone.
Files Required
1. Android 4.1.2 XXUAMK5 Jelly Bean Firmware (Mirror Link 1, Link 2)
2. Odin 3.07 (Mirror Link)
Steps to Update Galaxy Star Pro S7262 with Android 4.1.2 XXUAMK5 Jelly Bean Firmware
Step 1: Extract Firmware zip file using WinRAR/7-Zip/WinZip or any other extracting tool, you will get a .tar.md5 file and some other files (optional).
Step 2: Extract Odin zip file and you will get Odin3 v3.07.exe along with few other files.
Step 3: Switch off the Galaxy Star Pro.
Step 4: Boot the device into Download Mode by pressing and holding Volume Down, Home and Power buttons together until a construction Android robot icon with a warning triangle appears on Lcd. Now press the Volume Up button to enter Download Mode.
Step 5: Run Odin on the computer as an Administrator.
Step 6: Connect the Galaxy Star Pro to the computer using USB cable while it is in the Download Mode. Wait until Odin detects the device. When the device is connected successfully, the ID: COM box will turn to light blue with the COM port number. Additionally, the successful connected will be indicated by a message saying Added.
Note: If the Added message does not appear, then try re-install USB drivers or changing the port on the computer.
Step 7: Select the following files in Odin from extracted S7262XXUAMK5 firmware folder:
- Click the PDA button and select the .tar.md5 file.
- Click the Phone button and select file with MODEM in its name. Ignore if there is no such file.
- Click the CSC button and select file with CSC in its name. Ignore if there is no such file.
- Click the PIT button and select the .pit file. Ignore if there is no such file.
Step 8: In Odin, enable Auto Reboot and F. Reset Time checkboxes. Also, ensure the Re-Partition checkbox is chosen only if a .pit file was chosen in the previous step.
Step 9: Verify everything suggested in Step 7 and Step 8 is done correctly. Then hit the Start button to begin the installation process.
Step 10: Once the installation process is completed, your phone will restart and soon you will see a PASS message with green background in the left-most box at the very top of the Odin. You can now unplug the USB cable to disconnect your device from the computer.
Samsung Galaxy Star Pro S7262 should be now updated with official Android 4.1.2 XXUAMK5 Jelly Bean. Head over to Settings >> About Phone to verify the software version running on the device.
Note: If Galaxy Star Pro S7262 stuck at booting animation after Step 10 then go to recovery mode (press and hold the Volume Up, Home and Power buttons together) and perform Wipe data/Factory Reset and Wipe Cache Partition task before selecting reboot system now function. In recovery mode use Volume keys to navigate between options and Power key to select the option. Please note, performing wiping task will erase your device internal memory data and not external SD card data.
Sunday, September 21, 2014
How to Install Android 4 3 UBUGMK6 JB Firmware on Galaxy S3 I9300
Samsung has now launched Android 4.3 Jelly Bean is UBUGMK6 official firmware update for the Galaxy S3 GT-I9300. Updates the firmware was launched in various countries including Brazil one of them, and also can be downloaded for a manual update. This new firmware update just brings bug fixes and performance tweaks on the Galaxy S3 GT-I9300 you. Well right Keep reading this guide to learn further how to get an official stock Android 4.3 Jelly Bean I9300UBUGMK6 firmware running on the Galaxy S3 GT-I9300. Almost all possible ways in this alloy to update your device to this firmware discussed here. One thing to note that the official firmware flashing or installing the recovery kernel root access you will fail, in short it will unroot.

I9300UBUGMK6 Android 4.3 Jelly Bean firmware stok tersedia di kedua OTA dan Kies mengupdate. Namun, jika Anda tidak bisa mendapatkannya dari sana maka Anda bisa selalu menyala I9300UBUGMK6 Android 4.3 Jelly Bean firmware pada Galaxy S3 GT-I9300 manual. Kami akan membicarakan semua metode pembaruan yang tersedia. Anda harus selalu mencoba OTA atau metode Kies pertama dan ketika kedua metode tidak bekerja maka hanya mencoba flashing manual.
Warning: This tutorial is only for Galaxy S3 GT-I9300. Don’t try this guide on any other Android device. Also, we are not responsible for any damage caused due to the instruction given in this page. Try this at your own risk. However, it is very unlikely that your device will be damaged if you follow all the instructions as it is which are mentioned in procedure.
Pre Requisites:
Though official firmware restore all existing data but we recommend to back up your data first before proceeding to avoid any uncomfortable situation such as bootloop fix.
1. Backup your device data.
2. Make sure your device have at least 60% battery power. You can install an app like Battery Notifier BT Free on your Android device to check it easily.
3. You already have USB Driver Installed for Galaxy S3 GT-I9300 in your PC. Download USB Drivers
4. Make sure USB Debugging is enabled otherwise you won’t able to transfer file between PC and Galaxy
S3 GT-I9300.How To Update Galaxy S3 GT-I9300 via OTA
- First of all make sure you have stable internet connection (Wi-Fi or data network) on your device.
- Now, go to Android app drawer and then select Settings.
- Then locate About Device and tap on it.
- Next select Software update from About device Lcd.
- Then tap on Update option.
- You should see an update, press OK to download and install. (Remember, download using 3G or network data will incur additional charges to your phone bill!)
- Soon your device will reboot to complete the installation process.
How To Update Galaxy S3 GT-I9300 via Kies
- Make sure you have stable internet connection on your computer.
- Now download and install Samsung Kies on your computer.
- Turn on your device (if it off) and then connect it to computer with USB cable.
- Run Samsung Kies and wait for it to detect your device.
- You should see a New Firmware Upgrade is available at Samsung Kies home Lcd.
- Press the Firmware Upgrade button to proceed.
- Follow on Lcd instruction and soon you will see your device running upgrade and reboot automatically. Once done, you can disconnect your device from computer.
Again! If you see “This is the latest firmware” in Samsung Kies, then your device yet to receive the latest update on Kies. Its good time to go for manual update instruction that located below.
I9300UBUGMK6 Android 4.3 Jelly Bean Firmware Details:
PDA: I9300UBUGMK6
CSC: I9300ZTOUGMK3
Download: I9300UBUGMK6 I9300ZTOUGMK3_ZTO.zip
Please Note: After flashing this firmware you will lost any installed custom ROM including CM10.2, AOKP, Avatar,Beanstalk, Omni ROM, Slim ROM, Pac-Man, Paranoid Android, LiquidSmooth or Carbon.
How To Install I9300UBUGMK6 Android 4.3 Jelly Bean On Galaxy S3 GT-I9300 Manually
- Download Odin v3.09.
- Extract Firmware zip file that you downloaded earlier from above link, you will get a .tar.md5 file and some other files (optional).
- Extract Odin zip file and you will get Odin3 v3.09.exe along with few other files.
- Power off your Android device. Wait 5-6 seconds for vibration to confirm complete switch off.
- Now, put the Galaxy S3 GT-I9300 in Download Mode by pressing and holding down the Home & Volume Down button together while pressing the Power button. A warning Lcd will come up; press Volume Up button to enter Download Mode.
- Now run Odin3 v3.09.exe (see Step 3) as an Administrator because Admin privileges is required to complete the process smoothly (only applicable Windows Vista and higher).
- Now connect your device to your PC using USB cable. An “Added!!” massage will appear in Odin’s message box. If you don’t get the same then you should try another USB port (try USB port located in back in your desktop PC). If that too don’t work then you should reinstall the driver. If you successfully see the “Added!!” message in Odin then you are ready to go in next step. You should also see COM port with a number in Yellow if you successfully added your device.
- Click the AP Button, and select that .tar.md5 file that you get in Step 2.
- In Odin window, make sure only Auto Reboot and F. Reset Time checkboxes are selected.
- Double check everything that we mentioned in Step 8 & Step 9 above. Now, once satisfied hit the START button to begin the flashing process.
- Once flashing completed, your Galaxy S3 GT-I9300 will restart and soon you will see a PASS message with green background in the left-most box at the very top of the Odin. You can now unplug the USB cable to disconnect your device from computer.
Fix Boot Loop Issue On Galaxy S3 GT-I9300
If Galaxy S3 GT-I9300 stuck at booting animation for more than 10 minutes after Step 11 then follow below instructions:
- Go to recovery mode. To do so, press and hold the Volume Up, Home and Power buttons together.
- Now perform Wipe data/Factory Reset and Wipe Cache Partition task before selecting reboot system now function. In recovery mode use Volume keys to navigate between options and Power key to select the option.
That’s it! Let us know about your latest Android 4.3 Jelly Bean experience. visit and get more info ....
Friday, September 19, 2014
How to Root Your Samsung Galaxy Note 2 Canadian SGH I317M on Android 4 3 Jelly Bean Firmware Guide
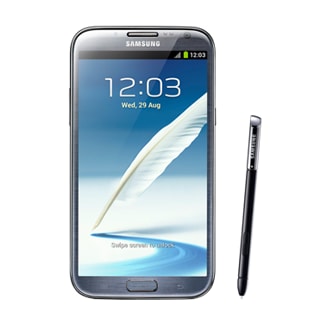
Samsung Galaxy Note 2 (Canadian) SGH-I317M users who have already updated their devices with Android 4.3 Jelly Bean, may root their devices using the tutorial below.
This tutorial uses CF-Auto-Root file released by Elite Recognized XDA-Developers, Chainfire. The CF-Auto-Root file allowing Galaxy Note 2 users to root their devices easily without depending on the firmware. It completely supports Android 4.3 Jelly Bean and future firmware as well. Head over to the CF-Auto-Root main thread to learn more about the root method.
Disclaimer: Rooting voids the warranty of your device. We and the developer of this rooting procedures shall not be held responsible if any undesirable outcomes may happen to your device. use of this root guide is solely at your own risk!
Pre-requisites
1. Install USB Driver for Samsung Galaxy Note 2 on the computer.
2. Enable USB Debugging Mode on the phone by navigating to Settings >> Developer Options.
3. Make a backup of all your important data before following the guide.
4. Ensure the battery of the phone is charged more than 80 percent.
5. The CF-Auto-Root file works only on the Canadian version of the Samsung Galaxy Note 2 (SGH-I317M) - Rogers, Bell, Telus, Virgin Mobile, Koodo, Fido, SaskTel. Applying this to any incorrect variant might brick the device. Verify the model number of the Galaxy Note 2 by navigating to Settings >> About Phone.
Files Required
1. CF-Auto-Root (Mirror Link) for Galaxy Note 2 (Canadian) SGH-I317M (CF-Auto-Root-t0ltecan-t0ltevl-sghi317m.zip)
2. Odin v3.09. (Mirror Link)
Steps to Root Galaxy Note 2 (Canadian) SGH-I317M Running on Android 4.3 Jelly Bean Firmware
Step 1: Extract CF-Auto-Root and Odin 3.07 files using WinRAR/7-Zip/WinZip or any other extracting tool.
Step 2: Switch off the Galaxy Note 2. Then boot the device into Download Mode by pressing and holding Volume Down, Home and Power buttons together until a construction Android robot icon with a warning triangle appears on Lcd. Now press the Volume Up button to enter Download Mode.
Step 3: Launch Odin on the computer as an Administrator.
Step 4: Connect the Galaxy Note 2 to the computer using USB cable while it is in the Download Mode. Wait until Odin detects the device. When the device is connected successfully, the ID: COM box will turn to light blue with the COM port number. Additionally, the successful connected will be indicated by a message saying Added.
Note: If the Added message does not appear, then try re-install USB drivers or changing the port on the computer.
Step 5: In Odin, click the PDA button and select the CF-Auto-Root-t0ltecan-t0ltevl-sghi317m.tar.md5 file.
Step 6: Verify that Auto Reboot and F. Reset Time checkboxes are selected in Odin. Also, ensure the Re-Partition option is NOT selected.
Step 7: Double-check and click Start button in Odin. The installation process will now begin.
Step 8: Once the installation process is completed, your phone will restart and soon you will see a PASS message with green background in the left-most box at the very top of the Odin. You can now unplug the USB cable to disconnect your device from the computer.
Samsung Galaxy Note 2 (Canadian) SGH-I317M running on Android 4.3 Jelly Bean firmware is now rooted successfully. You can now install any app that requires root permission. Verify the root status of the device by downloading Root Checker app from Google Play Store.
Thanks to all fellas at XDA who first tried out this rooting technique. This method was originally posted via XDA-Developers original thread.
How to Backup you device
All about Android-Series
Samsung Galaxy S3 - GT-I9300Part 2 -
How to Backup you device
Now that we have gotten fairly good at flashing Custom ROM, the biggest challenge we face is to restore all the application and application data we had earlier on our phone before going flash happy. It is often a very cumbersome task to download all you apps again from the PlayStore and the irritation goes to another level if we are in the midst of playing a big game and had completed 20 levels out of 22.
Once we do a Factory Reset/Data Wipe from the recovery menu all our saved data is lost and hence the Games and Apps.
In this blog I will update you on how to backup your device, your data and your apps effectively.
- Backing up your device
Once you have CWM installed, reboot into Recovery by pressing and holding Volume Up+Power+Home buttons together, release the buttons only when you see the Recovery Menu come on the Lcd.
Navigate to Backup and Recovery, Choose Backup from here.
This option will then backup all the system files, apps, app data and settings which you have on your device. There are two things which are not backed up here:
- Your data on Internal/External Sdcard
- Your Modem or Radio
To Restore this backup just navigate again to backup and restore option in CWM recovery. Choose Restore option from here and Select the Backup you want to restore.
This is also known as Nandroid Backup
2. Backing up your Applications and Application Data
Performing a Nandroid backup will not be useful if you want to try out a new ROM, as all the applications will be in the Nandroid backup and restore it you will have to restore the complete backup.
The best option here is to use Titanium Backup Application from the PlayStore. Get this app from here.
You will need to be rooted to use this application.
Now to backup your apps, fire up this application and grant it Superuser permissions.
It will show you all the apps which are not backed up. Choose the option of backing up all the apps with data.
It backs up all the apps and data on your internal sdcard.
Now after flashing a Custom ROM/New ROM you can restore all your applications to the same state by again going in TB and clicking restore all apps with data.
It is advisable that you dont restore System Apps and System Data if you have moved onto a different ROM, otherwise you will end up in Force Closes and unresponsive system.
3. Backing your SMSes
Another important data which we dont want to loose are our SMSes. To backup the SMSes we will use another application knows as SMS Backup and Restore. Get it from the PlayStore from here.
Open up the Application and click Backup. It will ask you for a name, give the backup a name preferably with a date. Now, you also have an option to save this backup in your dropbox account along with the SDcard. For it you will have to download an additional add-on for this app from here.
Once you have to add-on installed, navigate to Preferences>Backup Settings and Configure your Dropbox account here. Check that the Upload to Dropbox option is ticked. You can also configure a schedule for it to do the backups automatically and at the same time uploading it to Dropbox.
4. Backup Contacts
This is already done by Google and all your contacts get backed in your Google account automatically.
Just ensure that you have added a Google account in your phone and the sync option is turned On.
I hope after following all these steps your are fairly protected against any misfortunes and can go and flash as many ROMs as you want.
Enjoy the Android Goodnes !!
Sunday, September 14, 2014
How to Scan Codes Nokia Lumia 1520
1. First, you need to tap
2. Then tap on
3. And point the camera at the code. Make sure to keep the camera steady on the code and should be completely visible in the camera viewfinder.
Read More..
2. Then tap on
3. And point the camera at the code. Make sure to keep the camera steady on the code and should be completely visible in the camera viewfinder.
Thursday, September 11, 2014
How To Guide Install UBUEMK4 Android 4 3 JB Firmware on Galaxy Note 2 N7100
Samsung has just launched the Android 4.3 Jelly Bean UBUEMK4 official firmware update for Galaxy Note GT - N7100 2 . This firmware update has been released in various countries , including one of her Brazil and the Dominican Republic , and also can be downloaded for manual updates . You can also update your device firmware via Kies or OTA update . Because of this smartphone comes equipped with Jelly Bean Android 4.1.2 out of the box , this new firmware update will upgrade your smartphone to the OS which is certainly better that Android 4.3 Jelly Bean . Well Continue reading this guide to learn more about how to get an official stock Android 4.3 Jelly Bean N7100UBUEMK4 firmware that runs on the Galaxy Note GT - N7100 2 . Almost all the possible ways to update your device to this firmware discussed here . and the need to remember or One thing should be noted that the flashing or installing the official firmware kernel then restore your root access will be canceled , in short it will unroot it .

Android 4.3 Jelly Bean N7100UBUEMK4 stock firmware available in both OTA and Kies update. However, if you can not get it from there then you can always blink N7100UBUEMK4 Android 4.3 Jelly Bean firmware on Galaxy Note GT-N7100 manual 2. We will discuss all the methods available updates. You should always try OTA or Kies method first and when the two methods do not work then just try flashing manually.
Pre Requisites:
Though official firmware restore all existing data but we recommend to back up your data first before proceeding to avoid any uncomfortable situation such as bootloop fix.
1. Backup your device data.
2. Make sure your device have at least 60% battery power. You can install an app like Battery Notifier BT Free on your Android device to check it easily.
3. You already have USB Driver Installed for Galaxy Note 2 GT-N7100 in your PC.Download USB Drivers
4. Make sure USB Debugging is enabled otherwise you won’t able to transfer file between PC and Galaxy Note 2 GT-N7100.
Warning: This tutorial is only for Galaxy Note 2 GT-N7100. Don’t try this guide on any other Android device. Also, we are not responsible for any damage caused due to the instruction given in this page. Try this at your own risk. However, it is very unlikely that your device will be damaged if you follow all the instructions as it is which are mentioned in procedure.
How To Update Galaxy Note 2 GT-N7100 via OTA
- First of all make sure you have stable internet connection (Wi-Fi or data network) on your device.
- Now, go to Android app drawer and then select Settings.
- Then locate About Device and tap on it.
- Next select Software update from About device Lcd.
- Then tap on Update option.
- You should see an update, press OK to download and install. (Remember, download using 3G or network data will incur additional charges to your phone bill!)
- Soon your device will reboot to complete the installation process.
If you see “The latest update have already been installed” massage while checking update then your device yet to receive an OTA update. Check back within few days or jump to next procedure
.How To Update Galaxy Note 2 GT-N7100 via Kies
- Make sure you have stable internet connection on your computer.
- Now download and install Samsung Kies on your computer.
- Turn on your device (if it off) and then connect it to computer with USB cable.
- Run Samsung Kies and wait for it to detect your device.
- You should see a New Firmware Upgrade is available at Samsung Kies home Lcd.
- Press the Firmware Upgrade button to proceed.
- Follow on Lcd instruction and soon you will see your device running upgrade and reboot automatically. Once done, you can disconnect your device from computer.
Again! If you see “This is the latest firmware” in Samsung Kies, then your device yet to receive the latest update on Kies. Its good time to go for manual update instruction that located below.
Note: You can install any firmware listed below despite availability in other countries, except those which comes with carrier name.
N7100UBUEMK4 Android 4.3 Jelly Bean Firmware Downloads
Please Note: After flashing this firmware you will lost any installed custom ROM including CM10.2, AOKP, Avatar,Beanstalk, Omni ROM, Slim ROM, Pac-Man, Paranoid Android, LiquidSmooth or Carbon.
How To Install N7100UBUEMK4 Android 4.3 Jelly Bean On Galaxy Note 2 GT-N7100 Manually
- Download Odin v3.09.
- Extract Firmware zip file that you downloaded earlier from above link, you will get a .tar.md5 file and some other files (optional).
- Extract Odin zip file and you will get Odin3 v3.09.exe along with few other files.
- Power off your Android device. Wait 5-6 seconds for vibration to confirm complete switch off.
- Now, put the Galaxy Note 2 GT-N7100 in Download Mode by pressing and holding down the Home &Volume Down button together while pressing the Power button. A warning Lcd will come up; press Volume Up button to enter Download Mode.
- Now run Odin3 v3.09.exe (see Step 3) as an Administrator because Admin privileges is required to complete the process smoothly (only applicable Windows Vista and higher).
- Now connect your device to your PC using USB cable. An “Added!!” massage will appear in Odin’s message box. If you don’t get the same then you should try another USB port (try USB port located in back in your desktop PC). If that too don’t work then you should reinstall the driver. If you successfully see the “Added!!” message in Odin then you are ready to go in next step. You should also see COM port with a number in Yellow if you successfully added your device.
- Click the AP Button, and select that .tar.md5 file that you get in Step 2.
- In Odin window, make sure only Auto Reboot and F. Reset Time checkboxes are selected.
- Double check everything that we mentioned in Step 8 & Step 9 above. Now, once satisfied hit the START button to begin the flashing process.
- Once flashing completed, your Galaxy Note 2 GT-N7100 will restart and soon you will see a PASS message with green background in the left-most box at the very top of the Odin. You can now unplug the USB cable to disconnect your device from computer.
Congrats! You just updated your Galaxy Note 2 GT-N7100 to Android 4.3 Jelly Bean firmware. Go to Settings > About device to verify this firmware update.
Fix Boot Loop Issue On Galaxy Note 2 GT-N7100
If Galaxy Note 2 GT-N7100 stuck at booting animation for more than 10 minutes after Step 11 then follow below instructions:
- Go to recovery mode. To do so, press and hold the Volume Up, Home and Power buttons together.
- Now perform Wipe data/Factory Reset and Wipe Cache Partition task before selecting reboot system now function. In recovery mode use Volume keys to navigate between options and Power key to select the option.
Please note, performing wiping task will erase your device internal memory data and not external SD card data.
That’s it! Let us know about your latest Android 4.3 Jelly Bean experience.
Sunday, September 7, 2014
How To Install DXUAML3 Android 4 1 2 Jelly Bean Firmware on Galaxy Star Pro Duos S7262 Guide
Samsung launches Android 4.1.2 DXUAML3 official Jelly Bean firmware update for the Galaxy Pro Duos GT-S7262 Star. The firmware update is launched in various countries including Thailand and the Philippines, and also can be downloaded for manual updates. This new firmware update brings bug fixes and performance tweaks on the Galaxy Pro Duos GT-S7262 Star. Continue reading this guide to learn how to get an official stock S7262DXUAML3 Jelly Bean Android 4.1.2 firmware running on the Galaxy Pro Duos GT-S7262 Star.

Warning: This tutorial is only for Galaxy Star Pro Duos GT-S7262. Don’t try this guide on any other Android device. Also, we are not responsible for any damage caused due to the instruction given in this page. Try this at your own risk. However, it is very unlikely that your device will be damaged if you follow all the instructions as it is which are mentioned in procedure.
Pre Requisites:
Though official firmware restore all existing data but we recommend to back up your data first before proceeding to avoid any uncomfortable situation such as bootloop fix.
1. Backup your device data. You can follow our ultimate backup guide.
2. Make sure your device have at least 60% battery power. You can install an app like Battery Notifier BT Free on your Android device to check it easily.
3. You already have USB Driver Installed for Galaxy Star Pro Duos GT-S7262 in your PC. [Download USB Drivers]
4. Make sure USB Debugging is enabled otherwise you won’t able to transfer file between PC and Galaxy Star Pro Duos GT-S7262. [Guide].
How To Update Galaxy Star Pro Duos GT-S7262 via OTA
- First of all make sure you have stable internet connection (Wi-Fi or data network) on your device.
- Now, go to Android app drawer and then select Settings.
- Then locate About Device and tap on it.
- Next select Software update from About device Lcd.
- Then tap on Update option.
- You should see an update, press OK to download and install. (Remember, download using 3G or network data will incur additional charges to your phone bill!)
- Soon your device will reboot to complete the installation process.
If you see “The latest update have already been installed” massage while checking update then your device yet to receive an OTA update. Check back within few days or jump to next procedure.
How To Update Galaxy Star Pro Duos GT-S7262 via Kies
- Make sure you have stable internet connection on your computer.
- Now download and install Samsung Kies on your computer.
- Turn on your device (if it off) and then connect it to computer with USB cable.
- Run Samsung Kies and wait for it to detect your device.
- You should see a New Firmware Upgrade is available at Samsung Kies home Lcd.
- Press the Firmware Upgrade button to proceed.
- Follow on Lcd instruction and soon you will see your device running upgrade and reboot automatically. Once done, you can disconnect your device from computer
Again! If you see “This is the latest firmware” in Samsung Kies, then your device yet to receive the latest update on Kies. Its good time to go for manual update instruction that located below.
[Note: You can install any firmware listed below despite availability in other countries, except those which comes with carrier name.]
S7262DXUAML3 Android 4.1.2 Jelly Bean Firmware Downloads
- Thailand: S7262DXUAML3 S7262OLBAML3_THL.zip
- Philippines (Sun): S7262DXUAML3 S7262OLBAML3_XTC.zip
- Philippines (Globe): S7262DXUAML3 S7262OLBAML3_GLB.zip
- Philippines (Smart): S7262DXUAML3 S7262OLBAML3_SMA.zip
How To Install S7262DXUAML3 Android 4.1.2 Jelly Bean On Galaxy Star Pro Duos GT-S7262 Manually
- Download Odin v3.09.
- Extract Firmware zip file that you downloaded earlier from above link, you will get a .tar.md5 file and some other files (optional).
- Extract Odin zip file and you will get Odin3 v3.09.exe along with few other files.
- Power off your Android device. Wait 5-6 seconds for vibration to confirm complete switch off.
- Now, put the Galaxy Star Pro Duos GT-S7262 in Download Mode by pressing and holding down the Home &Volume Down button together while pressing the Power button. A warning Lcd will come up; press Volume Up button to enter Download Mode.
- Now run Odin3 v3.09.exe (see Step 3) as an Administrator because Admin privileges is required to complete the process smoothly (only applicable Windows Vista and higher).
- Now connect your device to your PC using USB cable. An “Added!!” massage will appear in Odin’s message box. If you don’t get the same then you should try another USB port (try USB port located in back in your desktop PC). If that too don’t work then you should reinstall the driver. If you successfully see the “Added!!” message in Odin then you are ready to go in next step. You should also see COM port with a number in Yellow if you successfully added your device.
- Click the AP Button, and select that .tar.md5 file that you get in Step 2. If you are using old Odin then add the file to PDA button.
- In Odin window, make sure only Auto Reboot and F. Reset Time checkboxes are selected.
- Double check everything that we mentioned in Step 8 & Step 9 above. Now, once satisfied hit the START button to begin the flashing process.
- Once flashing completed, your Galaxy Star Pro Duos GT-S7262 will restart and soon you will see a PASS message with green background in the left-most box at the very top of the Odin. You can now unplug the USB cable to disconnect your device from computer.
Congrats! You just updated your Galaxy Star Pro Duos GT-S7262 to Android 4.1.2 Jelly Bean firmware. Go toSettings > About device to verify this firmware update.
Fix Boot Loop Issue On Galaxy Star Pro Duos GT-S7262
If Galaxy Star Pro Duos GT-S7262 stuck at booting animation for more than 10 minutes after Step 11 then follow below instructions:
- Go to recovery mode. To do so, press and hold the Volume Up, Home and Power buttons together.
- Now perform Wipe data/Factory Reset and Wipe Cache Partition task before selecting reboot system now function. In recovery mode use Volume keys to navigate between options and Power key to select the option.
Please note, performing wiping task will erase your device internal memory data and not external SD card data.
That’s it! Let us know about your latest Android 4.1.2 Jelly Bean experience.
Subscribe to:
Posts (Atom)