Showing posts with label for. Show all posts

Monday, November 17, 2014

Solution for D880 Auto off after samsung logo


Solution for D880 Auto off after samsung logo
Read More..

Sunday, November 16, 2014

Nokia C1 Solution for C1 01 MIC microphone mouthpiece not working Solution

If encountered to fix a Nokia C1-01 microphone problem, heres the solution that might possibly solved the problem. The Solution below shows the microphone module on the Nokia C1-01 PCB board that needs to check or replace if found damaged.

The MIC module is located and mounted at the bottom of the PCB board layout. near the antenna terminal contact pins.There are four components being mounted near to it and this are composed of filter coils and an ESD protection resistor or capacitors.
Nokia C1-01 MIC - microphone mouthpiece Solution
nokia
You may check the filter coils first, if the coils is open or already busted replaced it.
If the filter coils were okay  you proceed to replace the MIC module if found damaged.
Read More..

Sunday, November 2, 2014

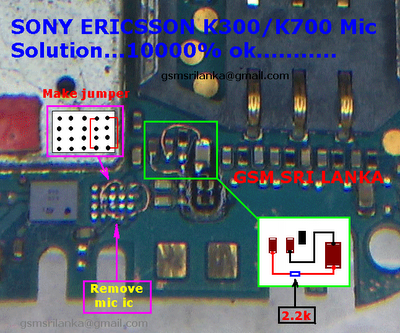
Sony Ericsson K300 K500 K700 Mic Ways Solution for Mic Not Working Problem

Easy Jumpers for K300/K500/K700 Mic Problem


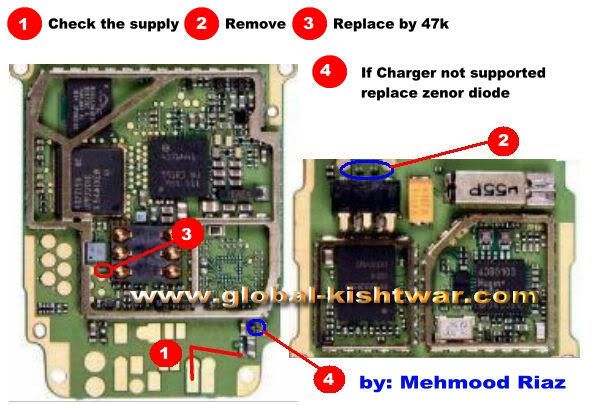
Another interesting for K300 Mic Problem  

K300 Mic Solution
Read More..

Sunday, October 26, 2014

How to flash Clockwork Mod Touch Recovery 6 0 1 2 for Galaxy S3 I9300

If you want to apply Clockwork Mod Touch Recovery 6.0.1.2 on your Samsung Galaxy S3 I9300, in this article I will present a guide about “how to Update Galaxy S3 I9300 with Clockwork Mod Touch Recovery 6.0.1.2.”
For make this update, please notes this tutorial could only have applied on rooted Samsung Galaxy S3 device. When you will install this recovery, you’ll be able to use custom ROMs firmware.
For be able to guide you need quick pre requisites to follow:
Warning
  • The instructions in this guide are intended for use with Galaxy S3 GT I9300 smartphone International version.
  • Applying these instructions on another device or model may produce undesired outcomes.
  • The information in this guide is provided for instructional and educational purposes only. There is no guarantee that these instructions will work under your specific and unique circumstances.
  • Use these instructions at your own risk. We shall not hold any responsibility or liability for whatever happens to you or your device arising from your use of the info in this guide.
  • Read and understand the whole guide first before actually performing the instructions.
Requirements
  • This custom recovery image is only for Galaxy S3 GT I9300 smartphone International version, and we will apply only for this model. If you apply on the network / boot loader locked devices.
We always recommends creating a manual full backup for your precious data present in your Samsung Galaxy S3 I9300 smartphone; you can use the next instruction below mentioned:
For SMS-you can use SMS backup and restore tutorial;
For contacts, you can use Sync with your Gmail tutorial;
For Call Logs, use Download Call Logs Backup & Restore App For Android;
For all Images, Video, Files, Songs- Should Copy to internal/ External SD card;
For save your APN and MMS Settings -“Applications > Settings > Wireless and Network > Mobile Networks > Access Point Names” or you can use this tutorial for save your internet settings.
  • Check your battery on your phone and charge it at a minimum is not less than 40%.
  • Go to access this path “Settings > Applications > Development > USB debugging”, and there verify if you’ve enable the USB Debugging, if not enable it.
  • Turn off all the antivirus protection and firewall tools, these can interrupt the proccess of firmware update.
  • Check if your device is rooted or not, for make this, please download the “Root Checker” application from here.
  • Verify again if you made all this prerequisites above mentioned and now you can forward the next instructions where we have detailed a guide on:

Guide to Install Custom Recovery Image in Samsung Galaxy S3 I9300:

  1. Download the Latest Clockwork Mod Touch Recovery 6.0.1.2 Image.
  2. Download Odin from here to your computer.
  3. Connect your phone on your computer with your original USB cable.
  4. Place this recovery file on your external SD Card, not in internal memory
  5. Now disconnect your phone from your computer and turn off the device, to enter in the Download Mode.
  6. To enter on Download mode, please holding the Volume Down button+ the Home Key button which it is in the middle.  Note: If your phone starts in “Normal Mode” retry the process to enter in Download Mode.
  7. Open Odin app, from your computer, and connect your device on “Download Mode”. Now check if the ID: COM section in Odin becomes Blue that indicating drivers have been successfully installed.
  8. Click on “PDA” to select “CF-Root-SGS3-v6.4.tar” file.
  9. Press “Start” after the file was selected to start the process of custom recovery installation.
Now you will see a progress bar that will indicate you the status process of custom recovery installation.
The device will restart, and the home screen will be displayed on your device, now you can disconnect your phone to the computer.
Attention Note: If your Samsung Galaxy S III doesn’t turn ON(just in a rare case) or say gets stuck on the Samsung Galaxy Logo, in this case you need to long press the power button to power off the device, or re insert the battery to start the process from the begin. 
Read More..

Sunday, September 7, 2014

FINAL SOLUTION for 1110 1600 2310 6030 CHARGING PROBLEM

Read More..

Saturday, September 6, 2014

Install Jelly Bean 4 1 2 XXUBMEA OTA Update for Samsung Galaxy S4 I9500

The XXUBMEA firmware has been released last week for the I9505 Snapdragon Galaxy S4 smartphone, now you can install the same version of it but designed to work with the Exynos 5 Octa Galaxy S4 variant. Read this entire post and you should be able to complete the updating process in under 10 minutes.
If you didn’t receive the official OTA Update to XXUBMEA Jelly Bean 4.1.2 firmware, then you should use this guide to manually flash all the required files. The new update fixes several bugs that were present in the previous builds that were delivered with the Galaxy S4. More info about this update  can be found here. In order to successfully complete the update, you will first have to take a look at the guidelines below:
  • use this guide only with the Samsung Galaxy S4 I9500 Exynos 5 Octa model. Don’t try to flash this firmware update on any other variant of the Galaxy S4 phone.
  • if your phone is rooted, then this update will revoke root access.
  • try to backup some of your most important files before starting the updating process.
  • if your smartphone doesn’t want to boot after you install XXUBMEA firmware, then you will be forced to apply some extra steps. You will need to boot into Recovery mode and factory reset the phone, which will delete data from your device.
  • download and install Samsung USB Drivers for your computer. Without these drivers your phone won’t be recognized by your computer and you will be forced to return here and reinstall them.
  • make sure that your PC doesn’t have the Samsung KIES software running while the ODIN program installs the new firmware update. Odin is a small program that is commonly used to flash tar.md5 files and other similar updating files for Samsung phones.
  • disable all the antivirus and other security applications from running on your computer.
  • enable USB Debugging from your phone’s Developer Options. If this menu doesn’t show up in Settings, then you need to open ‘About device’ section and then scroll down to ‘Build Number’. Tap the build number section 7 times for the Developer Options menu to be enabled.
  • make sure that you read the entire post before starting the update.
  • your phone’s battery power levels should be over 50%, as this will prevent it from powering off in the middle of the updating process.
  • don’t skip any steps that I have listed below, as you wouldn’t want to repeat the entire tutorial more than once.
  • this is a guide for advanced Android users and you shouldn’t attempt to use it in case you don’t know what you’re doing, as that will result in a failed attempt.
  • we cannot be blamed in case you lose any important files or you’ll brick the device in the process.
  • if you cannot complete the update, then you can ask for extra help in comments.
I think that these were all the instructions that you had to go over before starting to flash the updating files for your Exynos 5 Octa Galaxy S4 smartphone. Note that the updating process shouldn’t take more than 10 minutes to complete. Remember to read the extra instructions that I have listed at the end of this post only in case the device doesn’t want to boot with the new firmware update.

How to flash Android 4.1.2 XXUBMEA Jelly Bean OTA Update for the Samsung Galaxy S4 I9500:

  1.  Download the I9500XXUBMEA zip from HERE. Extract the contents of this file and save them on your PC desktop.
    > you will get a file that is titled ‘I9500XXUBMEA_I9500OLBBMEA_XSE.tar.md5‘. Don’t extract any further than that.
  2. Download Odin3 v3.07 from HERE. Extract the zip and place the files on your computer’s desktop screen.
  3. Power off your smartphone completely.
  4. Boot the device into Download Mode like this.
  5. Launch the Odin exe on your computer.
  6. Now, connect the device with your PC via USB cable.
    > wait for ODIN to say that the new device has been ‘added!!’ and then you can continue to the next step.
    > if the phone isn’t recognized, then you should plug it into another USB port or reinstall the Samsung USB Drivers using the download link listed in the preparation guide.
  7. Next, click the ‘PDA’ button and find the I9500XXUBMEA_I9500OLBBMEA_XSE.tar.md5 file. Load it into Odin.
    > don’t change any other default ODIN settings and make sure that Re-Partition option is not enabled.
  8. Click the START button to begin the updating process and then wait several minutes for all the files to be successfully installed on your device.
  9. When the update is complete ODIN will display a confirmation message and your Galaxy S4 Exynos 5 Octa phone will restart.
  10. Unplug the phone from PC when the Samsung logo screen appears.
  11. Wait for the phone to boot into normal mode and that should be all.
  12. Test all the new features and then tell us in comments if the overall performance of your device has been improved by the XXUBMEA Jelly Bean update.
These were the steps that you needed to take in order to complete the installation. If every step was completed without problems and the phone has successfully booted into normal mode, then you can close the tutorial and begin to test the new OS version.
If you encountered problems with the update, then you should take a look at the notes below.
NOTE 1: if ODIN froze, it showed an error message or some other thing blocked the update from installing correctly, then you should disconnect the phone from computer. Close ODIN and remove the phone’s battery. Re-insert the battery after several seconds have passed and then you will need to repeat the entire tutorial once again until your device will boot with the new OS.
NOTE 2: if ODIN says that the update has been installed correctly, but the phone doesn’t go past the Samsung boot animation, then you will need to ‘factory reset’ the device using the Recovery mode. This means that you will have to read the extra steps listed below:
  • power off your Galaxy S4 completely by removing its battery.
  • re-insert the battery and then boot the phone into stock Recovery Mode.
  • select ‘wipe data/ factory reset’ option and confirm this process.
  • when the factory reset has been correctly applied, select ‘reboot system now’.
  • wait for your device to boot into normal mode.
I hope that the update was applied successfully for your Galaxy S4. If you have any other questions, then you should ask for extra help in our comments section below.
Read More..

Download Guide MFI Multiloader for blackberry unlock

Here is Guide How to Unlock blackberry with MFI Multiloader


1. Download & instle latest blackberry desktop manager, download link check at blackberry faq


2. Download & instle NET Framework 2.0


3. Download & instle blackberry Operating System/flashfile which blackberry phone model you want to unlock , from here
also dont forget to Delete the vendor.xml file located in c:program filescommon files esearch in motionapploader


4. Download & instle MFI Multiloader


5. Download all parts for MULTILOADER & Unzip all parts and copy to "C:MML" - Overwrite all files there


6. Disconnect internet from your pc or you can do without disconnect internet by replace Configuration file

Now you ready to do your job


Open MFI Multiloader shorcut on your pc and connect your blackberry and wait untaill show pass


then your phone should be like this on bb screen


Now disconnect your blackberry from pc then type START to out cal mode then you will see error 507 , bla bla etc


Connect your blackberry then open blackberry desktop manager read & do point no 3. how To update/ReInstall BlackBerry Operating System ? from blackberry faq in sticky


Congratulations your blackberry unlock done by free with MFI Multiloder , You can now repalce your SIM and Memory card and set up your phone the way you like it.


If you got error during flash your blackberry No Software Update is required for your device by the way can be solve !!

Read More..

Wednesday, September 3, 2014

Complete List of USB Drivers for Android Phone for Windows PC

USB Drivers play a vital role when we wish to connect our phone to computer. You need to install USB Driver first for your mobile device to get connect and interact with your PC and theAndroid Smartphone and Tablet devices are not exception. We do various task by connecting our phone to PC such as- transferring data between computer and phone, syncing mobile to PC, rooting android phone, installing custom recovery like CWM Recover or TWRP Recovery, updating official firmware or flashing custom firmware. We need to use some tools like Odin, SuperOneClick etc. So, without installing the proper USB driver for your phone, you can’t connect it with your PC and do all these important task.


In this article, you’ll find USB Drivers for Android Devices for almost all Android Smartphone and tablets manufacturers such as- Samsung, Motorola, Sony, LG, HTC, Micromax, Acer, Dell, Lenovo, Asus, ZTE and many more. Although all the android mobile manufacturers provide USB drivers for their device along with the device model but you can also download drivers from their support page or anywhere else online. One more notable thing is, for most branded device windows install the USB driver automatically but if its not done, you have to do it manually.

Here we have listed USB drivers for android devices for almost all manufacturers. Note that, single USB driver from a manufacturer can be used for all the models of that manufacturer, so you do not need to download separate USB driver for all the models of the same manufacturer.Download USB driver for your android phone from the below list.

Note: All the USB drivers here listed are only for the Windows PC. If you are looking Android USB Drivers for Mac or Linux, then we recommend you to visit respective manufacturer website and download from their support page.


Download Android USB Driver for Samsung Mobile

Or Direct Download Samsung Kies from Here

Download Android USB Driver for LG Mobile


Download Android USB Driver for HTC Mobile

or Direct Download HTC Sync Manager from Here

Download USB Driver for Motorola Mobile


Download USB Driver for SONY Mobile

or Download Latest Sony PC Companion from here

Download USB Driver for Asus Mobile


Download USB Driver for Acer Mobile

Currently we do not have any direct download link for Acer USB Driver. You can download Acer Android USB Driver from the below process:

Choose country
Select Drivers and Manuals
Select your device
Select OS and Download driver from there
Download USB Driver for Lenovo Mobile 


Download USB Driver for Dell Mobile

No direct download link available. Follow the below step by step guide to download USB driver for Dell android mobile:

Click on tablet or mobile device
select device from the list
Download driver
Download USB Driver for ZTE Mobile


Download USB Driver for Huawei Mobile


Download USB Driver for Intel Mobile


Download USB Driver for Amazon Mobile


Download USB Driver for Sharp Mobile


Download USB Driver for Pantech


Download USB Driver for Alcatel Mobile


Download USB Driver for Fujitso Mobile


Download USB Driver for XIAOMI Mobile


Download USB Driver for Asus Garmin


Download USB Driver for KT Tech Mobile


Download USB Driver for Kyocera Mobile


Download USB Driver for Pegatron Mobile


Download USB Driver for Teleepoch USB Driver


Download USB Driver for Oppo Mobile


So, find USB driver for your android Smartphone or tablet from the above list. We have covered as much Android USB Drivers from various manufacturer. Hope you find USB driver for your android phone. If your android phone manufacturer is not in the above list, then contact with us with your mobile manufacturer name, model name and code number using the comment form below, we’ll help you to get USB driver for your mobile.
Read More..

Tuesday, August 19, 2014

iPhone solution for safe mode or springboard crash MOV


Read More..