


 .
.
Friday, September 26, 2014
Sony Ericsson k750 Mic Solution
if you check it much give few comments about this so that others can learn form your comments also.
If you have any other Questions please do not hesitate to share with me.
How to Screen Mirror Sony Xperia Z2 to Show the Screen on a TV
The Screen Mirroring will allow you to show the Lcd of your device on a TV or other large display without using a cable connections. It uses the Wi-Fi Direct technology that create a wireless connection between two devices. You can also use this feature to listen to music from your phone via the TVs speakers.
Warning: Your TV must support Lcd mirroring based on Wi-Fi CERTIFIED Miracast™ for thenfunctionality described above to work. If your TV does not support Lcd mirroring, you need to purchase a wireless display adapter separately.
Warning: When using Lcd mirroring, the image quality may sometimes be negatively impacted if there is interference from other Wi-Fi® networks.
How to mirror the Lcd of your phone on a TV:
1. First you need to turn on the Lcd mirroring function on your TV. Just follow the instructions in the User Guide of your TV.
2. From your Home Lcd, tap on the .
.
3. Select on Settings, and tap Xperia™.
4. Choose Screen mirroring.
5. Tap to turn on the Screen mirroring and select a device.
Warning: When using Lcd mirroring, do not cover the Wi-Fi antenna area of your device.
Read More..
Warning: Your TV must support Lcd mirroring based on Wi-Fi CERTIFIED Miracast™ for thenfunctionality described above to work. If your TV does not support Lcd mirroring, you need to purchase a wireless display adapter separately.
Warning: When using Lcd mirroring, the image quality may sometimes be negatively impacted if there is interference from other Wi-Fi® networks.
How to mirror the Lcd of your phone on a TV:
1. First you need to turn on the Lcd mirroring function on your TV. Just follow the instructions in the User Guide of your TV.
2. From your Home Lcd, tap on the
 .
.3. Select on Settings, and tap Xperia™.
4. Choose Screen mirroring.
5. Tap to turn on the Screen mirroring and select a device.
Warning: When using Lcd mirroring, do not cover the Wi-Fi antenna area of your device.
Nokia 5630 Display Problem Solution
Nokia 5630 Xpressmusic LCD Screen Display Problem Solution

Thursday, September 25, 2014
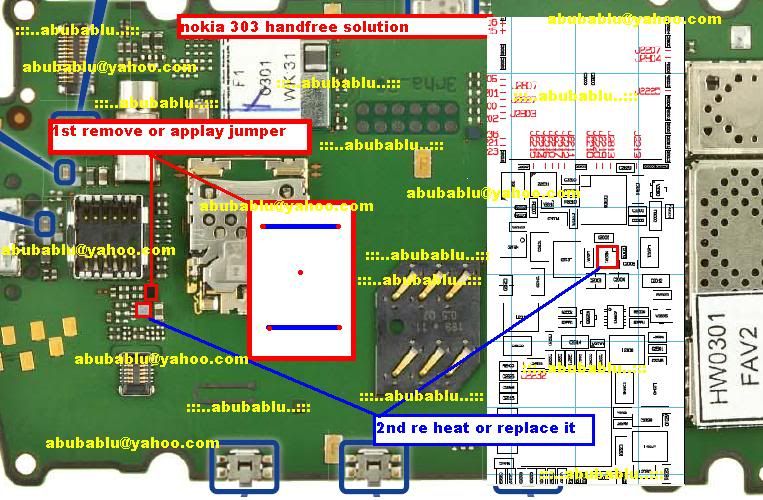
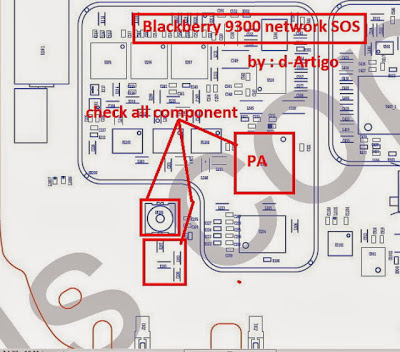
Blackberry 9300 No Network Repair solution
blackberry 9300 cellular phone network sos repair solution, blackberry 9300 cellular phone network sos call not accept solution ,blackberry 9300 network solution ,blackberry network not work solution ,blackberry 9300 network have phone but not calling only display show sos solution ,blackberry no have network solution,blackberry 9300 network repair solution,blackberry repair guide solution here ,blackberry 9300 pf solution, blackberry 9300 network ic jumper solution,blackberry network solution guide 100% tested solution here.if u have blackberry 9300 no network phone i have this phone network solution see my diagram 1st reheat this all read ic i hope solved your phone network problem not solved 2nd time change this pf 100% solved your phone network problem
 i hope solved your phone network problem plz share my post and dont forget visit my blog .

Htc One X hard reset

Htc One X data:
GSM frequencies :850 900 1800 1900
Standard UMTS :850 900 1900 2100
Type :Touch
Dimensions (W x H x D) :134,36 x 69,90 x 8,90 mm
Weight :130,00 g
Main display :Color / Super LCD
16M colors
720 x 1280 px (4.70") 312 ppi
Standard battery :Li-Ion 1800 mAh
Internal memory :32 GB
RAM memory :1 GB
Operating system :Android 4.0 Ice Cream Sandwich
Processor :Nvidia Tegra 3 T30
Processor clock :1,50 GHz
How to hard reset:
If you forgot your Lcd lock combination or password follow these steps.
Warning! All data will be lost!
1.Press together volume down + power button
2.Keep press untill recovery menu appears
3.Choose with volume buutons "factory reset" and select it with power button
4.Wait until phone restarts
Infinity Box CDMA Tool v1 96 released full installer
Infinity-Box CDMA-Tool v1.96 released
.Alcatel-C131 version B03 30-May-2013 supported
Download software from Official support area: Infinity CDMA-Tool - Support
Infinity-Box 9 (nine) years (2005 - 2013) non-stop regular updates and support, as nobody else: Infinity-Box - News
New features, Unlock Codes (Huawei, Motorola, Samsung etc.), iPhone Unlock, Software Activations released for Infinity-Box Online Service
Read More..
.Alcatel-C131 version B03 30-May-2013 supported
Download software from Official support area: Infinity CDMA-Tool - Support
Infinity-Box 9 (nine) years (2005 - 2013) non-stop regular updates and support, as nobody else: Infinity-Box - News
New features, Unlock Codes (Huawei, Motorola, Samsung etc.), iPhone Unlock, Software Activations released for Infinity-Box Online Service
Wednesday, September 24, 2014
Flash Backup v3 0 7 Full
 creates/restores phone memory backups
enables to manage firmware
patch function
built-in flash tool
Requirements
A compatible Motorola phone
USB cable
P2K driver
Windows 2000/XP or higher
Supported phones*
Motorola C380
Motorola C381P
Motorola C390
Motorola C650
Motorola E1 ROKR
Motorola E1000
Motorola E1070
Motorola E375
Motorola E398
Motorola E770v
Motorola K1 KRZR
Motorola K3
Motorola L2
Motorola L6
Motorola L7 SLVR
Motorola L7e
Motorola U6 PEBL
Motorola V180
Motorola V186
Motorola V188
Motorola V220
Motorola V235
Motorola V3
Motorola V300
Motorola V360
Motorola V3i
Motorola V3r
Motorola V3re
Motorola V3t
Motorola V3x
Motorola V3xx
Motorola V400
Motorola V500
Motorola V547
Motorola V6 MAXX
Motorola V600
Motorola V620
Motorola V635
Motorola V980
Motorola V9 RAZR2
Motorola Z3 RIZR
Operating with other models is possible
Download here
nokia 1800 ringer ways
When broken nokia 1800 ringer ways then need that ways.So I make this solution.May be Damage ringer ways in any phone especially water damage phone.If broken ringer ways then use this solution.
How to do this work : before make this jumper Check ringer speaker diode if they are ok but problem still then check ringer ways following this solution.If damage any line make this jumper using this picture.
Samsung Secret Codes
Here are the reset codes I have collected, i will give you the new and old secret codes for samsung phone
Here are the reset codes I have collected, i will give you the new and old secret codes for samsung phone : *#1111# S/W Version *#1234# Firmware Version *#2222# H/W Version *#8999*8376263# All Versions Together *#8999*8378# Test Menu *#4777*8665#...
*#1111# S/W Version
*#1234# Firmware Version
*#2222# H/W Version
*#8999*8376263# All Versions Together
*#8999*8378# Test Menu
*#4777*8665# GPSR Tool
*#8999*523# LCD Brightness
More 470 Cord Download,
if you check it much give few comments about this so that others can learn form your comments also.
If you have any other Questions please do not hesitate to share with me.
Master Reset Nokia X2 to Restore Factory Default Settings
Master Reset Nokia X2 to Restore Factory Default Settings - Nokia X2 is really a Quad-band GSM/handset which contains 2. 2 " 262K-color QVGA show having a resolution of 240 x 320 pixels. Beneath the actual Lcd you can understand 12-key alphamerical keypad, victimisation the actual normal arrangement of S40 buttons. It contains 2 GB external memory card thats expandable as much as 16GB. The actual property attributes : Bluetooth v2. 1 along with A2DP ; microUSB v2. 0 ; USB On-the-go assistance.

The actual X2 conjointly has 5 MP camera along with led flash and recording capability. For totally different choices you can conjointly discover : Stereo FM radio along with RDS ; integral antenna ; MP4/H. 263 participant ; MP3/WMA/eAAC+ participant ; Organizer ; exposure editor ; Flash nonfat v3. 0 ; Dedicated Facebook app ; Dedicated music secrets ; Stereo speakers ; Voice memo ; prognosticative textual content input ; and further.
Master Reset Nokia X2 to Restore Factory Default Settings
How to reset Nokia X2?
Nokia X2 Hard Reset Procedures
Nokia X2 Hard Reset Procedures
To restore the phone back to factory settings, select Menu > Settings > Rest. fact. sett. and from the following:
- Settings only — Reset all preference settings without deleting any personal data.
- All — Reset all preference settings and delete all personal data, such as contacts, messages, media files, and activation keys.
Tuesday, September 23, 2014
Huawei Ascend G615 Tips and Tricks
How to Backup and Factory Reset Huawei Ascend G615
Resetting your Huawei Ascend G615 will restore the default settings of your device. It will also delete all your files on your phone, so it is recommended to backup all your important files on your computer.
Luckily in Huawei Ascend G615 you can backup your phone settings and data before wiping all the data on your phone. But if you want to erase all the content on your phone, then there’s no need for you to backup your data.
How to Backup Your Data:
• Go to Settings.
• Select Backup & reset, then tap Reset phone.
• Then choose Backup data
How to Factory Reset:
• On the Settings Lcd, tap on Backup & reset > Factory data reset.
• Tap Reset phone according to the on-Lcd instructions.
• Then confirm the factory reset by tapping Erase everything.
The phone will reset to its factory settings then restarts itself.
How to Extend Battery Life of Huawei Ascend G615
Battery Life depends on how you use your device. For Huawei Ascend G615 device, if you want to save your battery to last longer hours, you may need to adjust your settings. Follow these suggestions:
• Lessen the Lcd brightness and the Lcd lock timeout.
• Turn down your device volume with the volume keys.
• Close any apps or features when you are done using it so they will not continuously running in the background.
• Turn off the network connection if you are out of range so that your device will stop searching for a network signal.
• You should use the latest version of the software update. Software updates improves some features and fixes some bugs on the previous software version.
• Turn off the camera flash.
• The camera viewfinder can be a power drain, so after youve finished taking photos.
How to Import Contacts from SIM Card on Huawei Ascend G615
How to Set Up Voicemail on Huawei Ascend G615
Read More..
Resetting your Huawei Ascend G615 will restore the default settings of your device. It will also delete all your files on your phone, so it is recommended to backup all your important files on your computer.
Luckily in Huawei Ascend G615 you can backup your phone settings and data before wiping all the data on your phone. But if you want to erase all the content on your phone, then there’s no need for you to backup your data.
How to Backup Your Data:
• Go to Settings.
• Select Backup & reset, then tap Reset phone.
• Then choose Backup data
How to Factory Reset:
• On the Settings Lcd, tap on Backup & reset > Factory data reset.
• Tap Reset phone according to the on-Lcd instructions.
• Then confirm the factory reset by tapping Erase everything.
The phone will reset to its factory settings then restarts itself.
How to Extend Battery Life of Huawei Ascend G615
Battery Life depends on how you use your device. For Huawei Ascend G615 device, if you want to save your battery to last longer hours, you may need to adjust your settings. Follow these suggestions:
• Lessen the Lcd brightness and the Lcd lock timeout.
• Turn down your device volume with the volume keys.
• Close any apps or features when you are done using it so they will not continuously running in the background.
• Turn off the network connection if you are out of range so that your device will stop searching for a network signal.
• You should use the latest version of the software update. Software updates improves some features and fixes some bugs on the previous software version.
• Turn off the camera flash.
• The camera viewfinder can be a power drain, so after youve finished taking photos.
Contacts is very important for everyone of us. We cant connect to our friends without a contact number. If you have a new phone, saving contacts on the phone one by one is so hassle. But if you have save your contacts on a Sim Card, then you can transfer your contacts from your SIM Card to your Huawei Ascend G615.
Follow these steps on how to import contacts from SIM Card:
1. On the contact list Lcd, tap on the 3-horizontal icon.
2. Then select Manage Contacts.
3. Tap Copy from SIM card. (Make sure that your SIM card is inserted on your phone.)
4. Touch one contact to individually import, or tap Select All to import all your contacts.
5. Then tap Copy.
Note: If you have more than one account on your phone, tap on the account you want to import the contacts.
Setting up a voicemail on your phone is relevant whenever youre busy to answer all your calls or when your phone is turned off. Voicemail service enables your phone to forward unanswered calls to your voice mailbox. Heres how to set up voicemail service on Huawei Ascend G615.
1. On your devices homeLcd touch and go to Settings.
2. Select Voicemail settings.
3. Tap on Voicemail number and enter your voicemail number.
4. Then tap on OK.
To listen to your voice messages, just press and hold the number 1 on the dialer and follow the instructions.
How to Manage Shortcuts and Widgets on Huawei Ascend G615
Adding Widgets on your HomeLcd will help you improve your productivity in using your Huawei Ascend G615. If you dont know what widgets means, Widgets are small applications that you can directly use on your HomeLcd. These will serve as your shortcut icon so will no longer need to access your Menu.
How to Add a Shortcut icon or Widget:
1. From your application list, tap and hold on the application icon.
2. Then drag it to the Home Lcd.
3. From the widget list, tap and hold on the widget you want to add.
4. Then drag the widget to the Home Lcd.
How to Delete a Shortcut icon or Widget:
1. On your Home Lcd, tap and hold the shortcut icon or widget you want to delete.
2. Then drag it to the trash bin.
How to Customize the Size of a Widget:
1. There are some widgets are resizeable, on your Home Lcd, tap and hold the widget you want to resize.
2. There should a four diamond will be displayed on the widget. Move the diamond to resize.
How to Move a Shortcut icon to the shortcut bar:
1. On your Home Lcd, tap and hold the shortcut icon that you want to move.
2, Then drag the icon to the shortcut bar at the bottom of the Lcd.
3. If there is no available space, a folder will be created for the overlapped icons.
How to Turn Huawei Ascend G615 a Wi-Fi Hotspot
Turning your smartphone into a portable wifi hotspot is a great idea if you have two or more devices you want to share your mobile network connection with. And if youre always on the go with a tablet or a laptop, you might probably appreciate more your smartphone when it becomes a wifi hotspot.Theres no need for you then to connect to other local network. Heres how to turn your Huawei Ascend G615 phone into a portable wifi hotspot.
1. On your devices homeLcd touch .
.
2. Go to Settings.
3. In the Wireless & Networks section, touch More...
4. Then select on Tethering and portable hotspot.
5. And select the Portable WiFi hotspot check box to share your mobile network.
If you want to secure or change your wifi hotspot name, just touch on Configure Wi-Fi hotspot.
How to Setup an Email Account on Huawei Ascend G615
Setting up an email on your Huawei Ascend G615 phone will let you receive and send email easily. So setup your phone and start sending emails to your friends.
How to setup an email account:
1. On your devices homeLcd touch.
2. Select Email.
3. Tap on Others to enter your email address and password.
4. Then tap Next. Just follow the on-Lcd instructions to configure the account settings.
5. Touch Next, and the Inbox of the newly configured email account will be displayed.
If you want to add another account after creating your initial email account, tap on the 3-horizontal lines > Settings > Add Account on the Inbox Lcd to add more email accounts.
How to Install and Uninstall Apps on Huawei Ascend G615
For Android smartphone users, Google Play store offers thousands of apps and games that you can install on your smartphone. These apps ranges from educational to entertainment apps. Now to brighten up your Huawei Ascend phone, here are the steps on how you can install and also uninstall these apps right on your phone.
To install an app:
1. Open the Play Store app on your phone by touching on the home Lcd and then go to Play Store.
2. Choose and touch a category among the list and then the application you wish to download.
3. Once youre done reading the application details like its cost, ratings and comments, touch Download or Install.
4. And touch on Accept & Download.
There you go. Youve just downloaded and installed an app on your phone. Itll only take few seconds before the app is completely installed. Youll see the content download icon in the notification bar once the app is downloaded and installed.
To uninstall an app:
1. On the Play Store Lcd, touch .
.
2. Go to My Apps to view the list of your downloaded apps.
3. Touch the app you want to uninstall and then touch Uninstall.
4. Touch OK to confirm.
Youve just successfully uninstalled an app from your phone.
1. On your devices homeLcd touch
and go to Settings.2. Select Voicemail settings.
3. Tap on Voicemail number and enter your voicemail number.
4. Then tap on OK.
To listen to your voice messages, just press and hold the number 1 on the dialer and follow the instructions.
How to Manage Shortcuts and Widgets on Huawei Ascend G615
Adding Widgets on your HomeLcd will help you improve your productivity in using your Huawei Ascend G615. If you dont know what widgets means, Widgets are small applications that you can directly use on your HomeLcd. These will serve as your shortcut icon so will no longer need to access your Menu.
How to Add a Shortcut icon or Widget:
1. From your application list, tap and hold on the application icon.
2. Then drag it to the Home Lcd.
3. From the widget list, tap and hold on the widget you want to add.
4. Then drag the widget to the Home Lcd.
How to Delete a Shortcut icon or Widget:
1. On your Home Lcd, tap and hold the shortcut icon or widget you want to delete.
2. Then drag it to the trash bin.
How to Customize the Size of a Widget:
1. There are some widgets are resizeable, on your Home Lcd, tap and hold the widget you want to resize.
2. There should a four diamond will be displayed on the widget. Move the diamond to resize.
How to Move a Shortcut icon to the shortcut bar:
1. On your Home Lcd, tap and hold the shortcut icon that you want to move.
2, Then drag the icon to the shortcut bar at the bottom of the Lcd.
3. If there is no available space, a folder will be created for the overlapped icons.
How to Turn Huawei Ascend G615 a Wi-Fi Hotspot
Turning your smartphone into a portable wifi hotspot is a great idea if you have two or more devices you want to share your mobile network connection with. And if youre always on the go with a tablet or a laptop, you might probably appreciate more your smartphone when it becomes a wifi hotspot.Theres no need for you then to connect to other local network. Heres how to turn your Huawei Ascend G615 phone into a portable wifi hotspot.
1. On your devices homeLcd touch
.2. Go to Settings.
3. In the Wireless & Networks section, touch More...
4. Then select on Tethering and portable hotspot.
5. And select the Portable WiFi hotspot check box to share your mobile network.
If you want to secure or change your wifi hotspot name, just touch on Configure Wi-Fi hotspot.
Setting up an email on your Huawei Ascend G615 phone will let you receive and send email easily. So setup your phone and start sending emails to your friends.
How to setup an email account:
1. On your devices homeLcd touch
.2. Select Email.
3. Tap on Others to enter your email address and password.
4. Then tap Next. Just follow the on-Lcd instructions to configure the account settings.
5. Touch Next, and the Inbox of the newly configured email account will be displayed.
If you want to add another account after creating your initial email account, tap on the 3-horizontal lines > Settings > Add Account on the Inbox Lcd to add more email accounts.
How to Install and Uninstall Apps on Huawei Ascend G615
For Android smartphone users, Google Play store offers thousands of apps and games that you can install on your smartphone. These apps ranges from educational to entertainment apps. Now to brighten up your Huawei Ascend phone, here are the steps on how you can install and also uninstall these apps right on your phone.
To install an app:
1. Open the Play Store app on your phone by touching
on the home Lcd and then go to Play Store.2. Choose and touch a category among the list and then the application you wish to download.
3. Once youre done reading the application details like its cost, ratings and comments, touch Download or Install.
4. And touch on Accept & Download.
There you go. Youve just downloaded and installed an app on your phone. Itll only take few seconds before the app is completely installed. Youll see the content download icon in the notification bar once the app is downloaded and installed.
To uninstall an app:
.2. Go to My Apps to view the list of your downloaded apps.
3. Touch the app you want to uninstall and then touch Uninstall.
4. Touch OK to confirm.
Youve just successfully uninstalled an app from your phone.
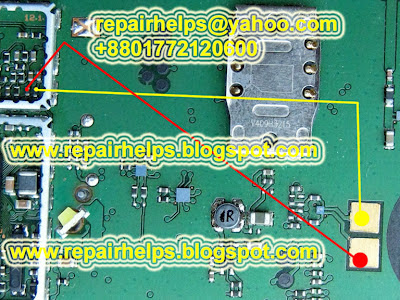
How To Repair Samsung Galaxy S I9000 imei Guide
First Method:
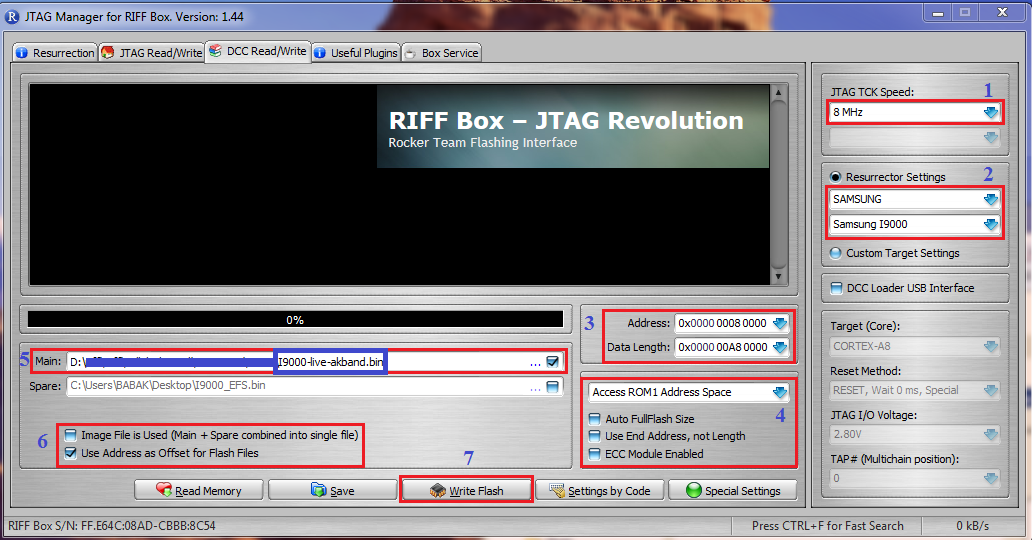
Guide:
1-Select "Speed"
2-Select "I9000" Model
3-Set "Start Address" "Data Length"
4-Uncheck 3 option...Select "Rom1"
5-Open "Full Dump file" in "Main" Window
6-Select "Use Adress as Offset xxxxxx"
7-Press "write"
After Finish,Please Check Phone,if Imei Back to "0044xxxxxx"....Your Problem Solved...
Secound Method :
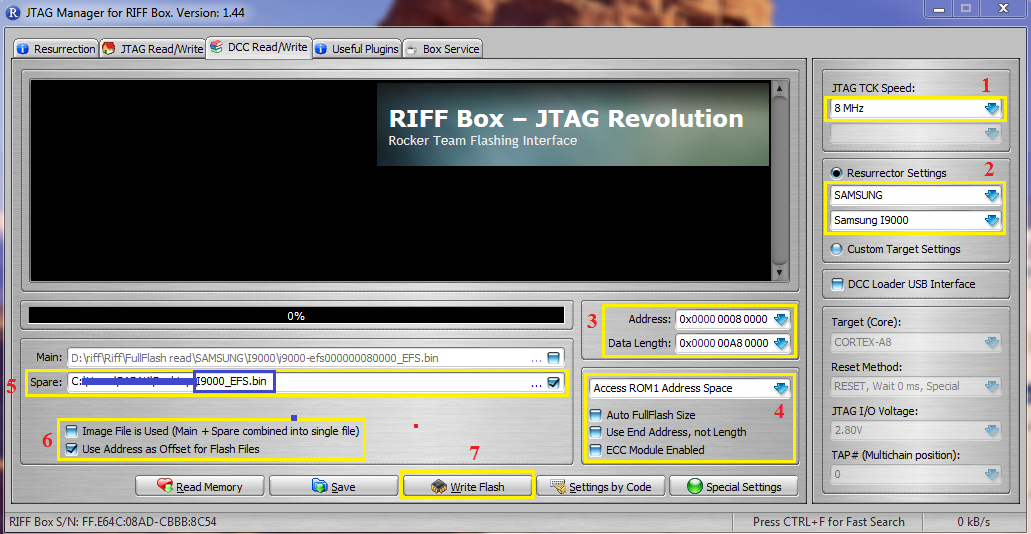
Guide:
1-Select "Speed"
2-Select "I9000" Model
3-Set "Start Address" "Data Length"
4-Uncheck 3 option...Select "Rom1"
5-Open "I9000_EFS.bin" in "Spare" Window
6-Select "Use Adress as Offset xxxxxx"
7-Press "write"
Download "I9000_EFS.bin" From Here:
https://hotfile.com/dl/174851499/35e...0_EFS.rar.html
Third Method:
Please Open "Samsung I9000-Like Full Flash Image Files " in "Useful Plugin Tab"
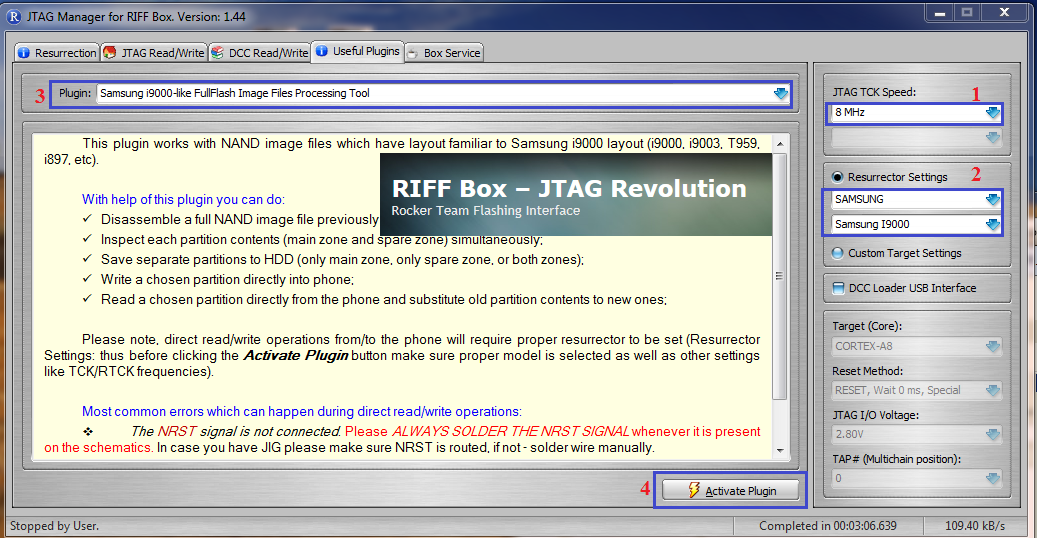
Then :
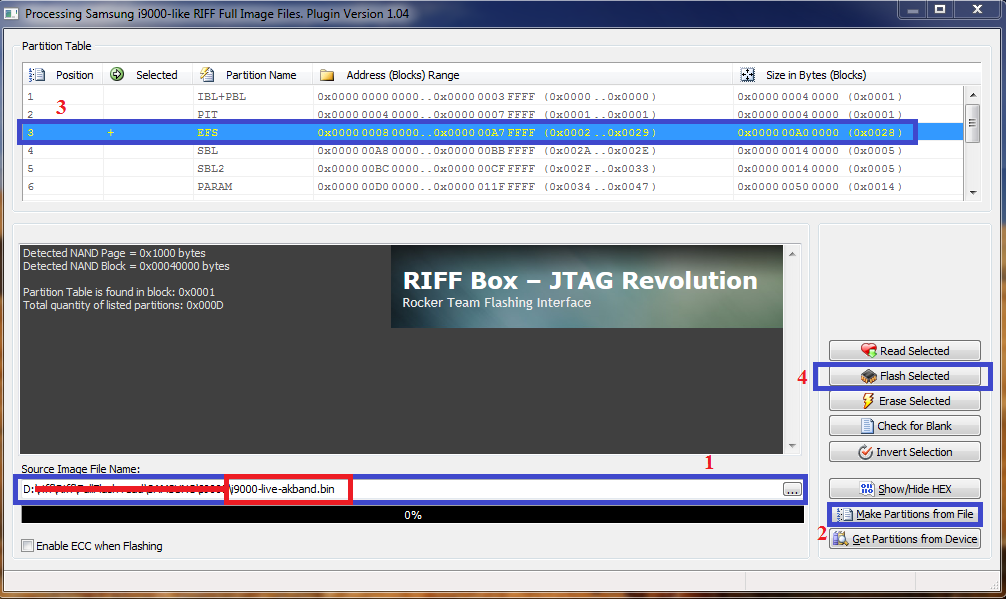
Guide:
1-Open "Full Dump File" in "Source Image File Name" Window
2-Press "Make Partition From File"
3-Double click On Partition 3...."This is EFS Partition"
4-Press "Flash Selected
Enjoy
Guide:
1-Select "Speed"
2-Select "I9000" Model
3-Set "Start Address" "Data Length"
4-Uncheck 3 option...Select "Rom1"
5-Open "Full Dump file" in "Main" Window
6-Select "Use Adress as Offset xxxxxx"
7-Press "write"
After Finish,Please Check Phone,if Imei Back to "0044xxxxxx"....Your Problem Solved...
Secound Method :
Guide:
1-Select "Speed"
2-Select "I9000" Model
3-Set "Start Address" "Data Length"
4-Uncheck 3 option...Select "Rom1"
5-Open "I9000_EFS.bin" in "Spare" Window
6-Select "Use Adress as Offset xxxxxx"
7-Press "write"
Download "I9000_EFS.bin" From Here:
https://hotfile.com/dl/174851499/35e...0_EFS.rar.html
Third Method:
Please Open "Samsung I9000-Like Full Flash Image Files " in "Useful Plugin Tab"
Then :
Guide:
1-Open "Full Dump File" in "Source Image File Name" Window
2-Press "Make Partition From File"
3-Double click On Partition 3...."This is EFS Partition"
4-Press "Flash Selected
Enjoy
Samsung I9100 GalaxyS2 Camera not working fix problem

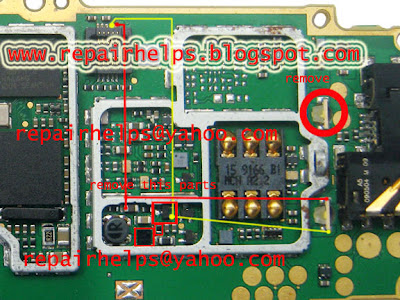
Nokia 5230 Ear Speaker Ways Jumper fix problem
Nokia Mobile 5230 Speaker solution.ear Speaker Not Working How to Fix problem,ear Speaker No Sound in Mobile How to Fix problem 100% Tested Just Replace it Red Marked Show in Diagram.

If You Have Any Doubt Please Comment Me I Share My Experience With you tnxx.
Read More..

If You Have Any Doubt Please Comment Me I Share My Experience With you tnxx.
Huawei Ascend G615 Tips and Tricks
 It is very important if you know some tips on your device like Huawei Ascend G615. It will help you learn more about your device to make your life much easier in using it. Improving your productivity and fulfilling what you expected on your Huawei Ascend G615.
Here are some How Tos for your Huawei Ascend G615 These How Tos may still not yet complete and I am finding some time to work on the others:
How to Backup and Factory Reset Huawei Ascend G615
Resetting your Huawei Ascend G615 will restore the default settings of your device. It will also delete all your files on your phone, so it is recommended to backup all your important files on your computer.
Luckily in Huawei Ascend G615 you can backup your phone settings and data before wiping all the data on your phone. But if you want to erase all the content on your phone, then there’s no need for you to backup your data.
How to Backup Your Data:
• Go to Settings.
• Select Backup & reset, then tap Reset phone.
• Then choose Backup data
How to Factory Reset:
• On the Settings Lcd, tap on Backup & reset > Factory data reset.
• Tap Reset phone according to the on-Lcd instructions.
• Then confirm the factory reset by tapping Erase everything.
The phone will reset to its factory settings then restarts itself.
How to Extend Battery Life of Huawei Ascend G615
Battery Life depends on how you use your device. For Huawei Ascend G615 device, if you want to save your battery to last longer hours, you may need to adjust your settings. Follow these suggestions:
• Lessen the Lcd brightness and the Lcd lock timeout.
• Turn down your device volume with the volume keys.
• Close any apps or features when you are done using it so they will not continuously running in the background.
• Turn off the network connection if you are out of range so that your device will stop searching for a network signal.
• You should use the latest version of the software update. Software updates improves some features and fixes some bugs on the previous software version.
• Turn off the camera flash.
• The camera viewfinder can be a power drain, so after youve finished taking photos.
Contacts is very important for everyone of us. We cant connect to our friends without a contact number. If you have a new phone, saving contacts on the phone one by one is so hassle. But if you have save your contacts on a Sim Card, then you can transfer your contacts from your SIM Card to your Huawei Ascend G615.
Follow these steps on how to import contacts from SIM Card:
1. On the contact list Lcd, tap on the 3-horizontal icon.
2. Then select Manage Contacts.
3. Tap Copy from SIM card. (Make sure that your SIM card is inserted on your phone.)
4. Touch one contact to individually import, or tap Select All to import all your contacts.
5. Then tap Copy.
Note: If you have more than one account on your phone, tap on the account you want to import the contacts.
Follow these steps on how to import contacts from SIM Card:
1. On the contact list Lcd, tap on the 3-horizontal icon.
2. Then select Manage Contacts.
3. Tap Copy from SIM card. (Make sure that your SIM card is inserted on your phone.)
4. Touch one contact to individually import, or tap Select All to import all your contacts.
5. Then tap Copy.
Note: If you have more than one account on your phone, tap on the account you want to import the contacts.
Setting up a voicemail on your phone is relevant whenever youre busy to answer all your calls or when your phone is turned off. Voicemail service enables your phone to forward unanswered calls to your voice mailbox. Heres how to set up voicemail service on Huawei Ascend G615.
1. On your devices homeLcd touchand go to Settings.
2. Select Voicemail settings.
3. Tap on Voicemail number and enter your voicemail number.
4. Then tap on OK.
To listen to your voice messages, just press and hold the number 1 on the dialer and follow the instructions.
How to Manage Shortcuts and Widgets on Huawei Ascend G615
Adding Widgets on your HomeLcd will help you improve your productivity in using your Huawei Ascend G615. If you dont know what widgets means, Widgets are small applications that you can directly use on your HomeLcd. These will serve as your shortcut icon so will no longer need to access your Menu.
How to Add a Shortcut icon or Widget:
1. From your application list, tap and hold on the application icon.
2. Then drag it to the Home Lcd.
3. From the widget list, tap and hold on the widget you want to add.
4. Then drag the widget to the Home Lcd.
How to Delete a Shortcut icon or Widget:
1. On your Home Lcd, tap and hold the shortcut icon or widget you want to delete.
2. Then drag it to the trash bin.
How to Customize the Size of a Widget:
1. There are some widgets are resizeable, on your Home Lcd, tap and hold the widget you want to resize.
2. There should a four diamond will be displayed on the widget. Move the diamond to resize.
How to Move a Shortcut icon to the shortcut bar:
1. On your Home Lcd, tap and hold the shortcut icon that you want to move.
2, Then drag the icon to the shortcut bar at the bottom of the Lcd.
3. If there is no available space, a folder will be created for the overlapped icons.
How to Turn Huawei Ascend G615 a Wi-Fi Hotspot
Turning your smartphone into a portable wifi hotspot is a great idea if you have two or more devices you want to share your mobile network connection with. And if youre always on the go with a tablet or a laptop, you might probably appreciate more your smartphone when it becomes a wifi hotspot.Theres no need for you then to connect to other local network. Heres how to turn your Huawei Ascend G615 phone into a portable wifi hotspot.
1. On your devices homeLcd touch.
2. Go to Settings.
3. In the Wireless & Networks section, touch More...
4. Then select on Tethering and portable hotspot.
5. And select the Portable WiFi hotspot check box to share your mobile network.
If you want to secure or change your wifi hotspot name, just touch on Configure Wi-Fi hotspot.
How to Setup an Email Account on Huawei Ascend G615
Setting up an email on your Huawei Ascend G615 phone will let you receive and send email easily. So setup your phone and start sending emails to your friends.
How to setup an email account:
1. On your devices homeLcd touch.
2. Select Email.
3. Tap on Others to enter your email address and password.
4. Then tap Next. Just follow the on-Lcd instructions to configure the account settings.
5. Touch Next, and the Inbox of the newly configured email account will be displayed.
If you want to add another account after creating your initial email account, tap on the 3-horizontal lines > Settings > Add Account on the Inbox Lcd to add more email accounts.
How to Install and Uninstall Apps on Huawei Ascend G615
For Android smartphone users, Google Play store offers thousands of apps and games that you can install on your smartphone. These apps ranges from educational to entertainment apps. Now to brighten up your Huawei Ascend phone, here are the steps on how you can install and also uninstall these apps right on your phone.
To install an app:
1. Open the Play Store app on your phone by touching on the home Lcd and then go to Play Store.
2. Choose and touch a category among the list and then the application you wish to download.
3. Once youre done reading the application details like its cost, ratings and comments, touch Download or Install.
4. And touch on Accept & Download.
There you go. Youve just downloaded and installed an app on your phone. Itll only take few seconds before the app is completely installed. Youll see the content download icon in the notification bar once the app is downloaded and installed.
To uninstall an app:
1. On the Play Store Lcd, touch.
2. Go to My Apps to view the list of your downloaded apps.
3. Touch the app you want to uninstall and then touch Uninstall.
4. Touch OK to confirm.
Youve just successfully uninstalled an app from your phone.
1. On your devices homeLcd touch
and go to Settings.2. Select Voicemail settings.
3. Tap on Voicemail number and enter your voicemail number.
4. Then tap on OK.
To listen to your voice messages, just press and hold the number 1 on the dialer and follow the instructions.
How to Manage Shortcuts and Widgets on Huawei Ascend G615
Adding Widgets on your HomeLcd will help you improve your productivity in using your Huawei Ascend G615. If you dont know what widgets means, Widgets are small applications that you can directly use on your HomeLcd. These will serve as your shortcut icon so will no longer need to access your Menu.
How to Add a Shortcut icon or Widget:
1. From your application list, tap and hold on the application icon.
2. Then drag it to the Home Lcd.
3. From the widget list, tap and hold on the widget you want to add.
4. Then drag the widget to the Home Lcd.
How to Delete a Shortcut icon or Widget:
1. On your Home Lcd, tap and hold the shortcut icon or widget you want to delete.
2. Then drag it to the trash bin.
How to Customize the Size of a Widget:
1. There are some widgets are resizeable, on your Home Lcd, tap and hold the widget you want to resize.
2. There should a four diamond will be displayed on the widget. Move the diamond to resize.
How to Move a Shortcut icon to the shortcut bar:
1. On your Home Lcd, tap and hold the shortcut icon that you want to move.
2, Then drag the icon to the shortcut bar at the bottom of the Lcd.
3. If there is no available space, a folder will be created for the overlapped icons.
How to Turn Huawei Ascend G615 a Wi-Fi Hotspot
Turning your smartphone into a portable wifi hotspot is a great idea if you have two or more devices you want to share your mobile network connection with. And if youre always on the go with a tablet or a laptop, you might probably appreciate more your smartphone when it becomes a wifi hotspot.Theres no need for you then to connect to other local network. Heres how to turn your Huawei Ascend G615 phone into a portable wifi hotspot.
1. On your devices homeLcd touch
.2. Go to Settings.
3. In the Wireless & Networks section, touch More...
4. Then select on Tethering and portable hotspot.
5. And select the Portable WiFi hotspot check box to share your mobile network.
If you want to secure or change your wifi hotspot name, just touch on Configure Wi-Fi hotspot.
Setting up an email on your Huawei Ascend G615 phone will let you receive and send email easily. So setup your phone and start sending emails to your friends.
How to setup an email account:
1. On your devices homeLcd touch
.2. Select Email.
3. Tap on Others to enter your email address and password.
4. Then tap Next. Just follow the on-Lcd instructions to configure the account settings.
5. Touch Next, and the Inbox of the newly configured email account will be displayed.
If you want to add another account after creating your initial email account, tap on the 3-horizontal lines > Settings > Add Account on the Inbox Lcd to add more email accounts.
How to Install and Uninstall Apps on Huawei Ascend G615
For Android smartphone users, Google Play store offers thousands of apps and games that you can install on your smartphone. These apps ranges from educational to entertainment apps. Now to brighten up your Huawei Ascend phone, here are the steps on how you can install and also uninstall these apps right on your phone.
To install an app:
1. Open the Play Store app on your phone by touching
on the home Lcd and then go to Play Store.2. Choose and touch a category among the list and then the application you wish to download.
3. Once youre done reading the application details like its cost, ratings and comments, touch Download or Install.
4. And touch on Accept & Download.
There you go. Youve just downloaded and installed an app on your phone. Itll only take few seconds before the app is completely installed. Youll see the content download icon in the notification bar once the app is downloaded and installed.
To uninstall an app:
.2. Go to My Apps to view the list of your downloaded apps.
3. Touch the app you want to uninstall and then touch Uninstall.
4. Touch OK to confirm.
Youve just successfully uninstalled an app from your phone.
Monday, September 22, 2014
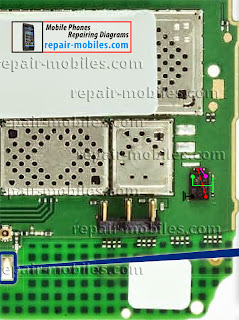
Nokia asha 206 display ways problem jumper solution
This is the solution of nokia asha 206 display problems and lcd ways problems.May be some time it has damage display ways normally or water damage then phones display has problem.So I create this solution for that problem.Some time this phone has white Lcd then you can repair using this solution.
![Nokia]()
How to Root Samsung Galaxy Star Pro S7262 Using Android 4 1 2 Jelly Bean Firmware and Install CWM Recovery
Samsung has already released the Android 4.1.2 Jelly Bean update with firmware build number S7262XXUAMK5 for the Galaxy Star Pro with dual SIM card slot (GT-S7262). The new official firmware is now available as an Over-The-Air (OTA) update as well as through Samsung KIES.
Firmware details
PDA: S7262XXUAMK5
CSC: S7262ODDAMK2
MODEM: S7262XXUAMK2
Version: Android 4.1.2
Build date: Nov 23, 2013
Regions: India, Nepal, Sri Lanka, Bangladesh
Samsung Galaxy Star Pro S7262 users who missed the OTA update notification or unable to access the update over Samsung KIES, can now download and install the same manually using our step-by-step guide.
Pre-requisites
1. Install USB Drivers for Samsung Galaxy Star Pro on the computer.
2. Enable USB Debugging Mode on the phone by navigating to Settings >> Developer Options.
3. Make a backup of all your important data before following the guide.
4. The Galaxy Star Pro should be factory unlocked and not locked to any particular carrier.
5. Ensure the battery of the phone is charged more than 80 percent.
6. The Android 4.1.2 XXUAMK5 Jelly Bean firmware is compatible only with the Samsung Galaxy Star Pro (GT-S7262). Applying this to any incorrect variant might brick the device. Verify the model number of the Galaxy Star Pro by navigating to Settings >> About Phone.
Files Required
1. Android 4.1.2 XXUAMK5 Jelly Bean Firmware (Mirror Link 1, Link 2)
2. Odin 3.07 (Mirror Link)
Steps to Update Galaxy Star Pro S7262 with Android 4.1.2 XXUAMK5 Jelly Bean Firmware
Step 1: Extract Firmware zip file using WinRAR/7-Zip/WinZip or any other extracting tool, you will get a .tar.md5 file and some other files (optional).
Step 2: Extract Odin zip file and you will get Odin3 v3.07.exe along with few other files.
Step 3: Switch off the Galaxy Star Pro.
Step 4: Boot the device into Download Mode by pressing and holding Volume Down, Home and Power buttons together until a construction Android robot icon with a warning triangle appears on Lcd. Now press the Volume Up button to enter Download Mode.
Step 5: Run Odin on the computer as an Administrator.
Step 6: Connect the Galaxy Star Pro to the computer using USB cable while it is in the Download Mode. Wait until Odin detects the device. When the device is connected successfully, the ID: COM box will turn to light blue with the COM port number. Additionally, the successful connected will be indicated by a message saying Added.
Note: If the Added message does not appear, then try re-install USB drivers or changing the port on the computer.
Step 7: Select the following files in Odin from extracted S7262XXUAMK5 firmware folder:
- Click the PDA button and select the .tar.md5 file.
- Click the Phone button and select file with MODEM in its name. Ignore if there is no such file.
- Click the CSC button and select file with CSC in its name. Ignore if there is no such file.
- Click the PIT button and select the .pit file. Ignore if there is no such file.
Step 8: In Odin, enable Auto Reboot and F. Reset Time checkboxes. Also, ensure the Re-Partition checkbox is chosen only if a .pit file was chosen in the previous step.
Step 9: Verify everything suggested in Step 7 and Step 8 is done correctly. Then hit the Start button to begin the installation process.
Step 10: Once the installation process is completed, your phone will restart and soon you will see a PASS message with green background in the left-most box at the very top of the Odin. You can now unplug the USB cable to disconnect your device from the computer.
Samsung Galaxy Star Pro S7262 should be now updated with official Android 4.1.2 XXUAMK5 Jelly Bean. Head over to Settings >> About Phone to verify the software version running on the device.
Note: If Galaxy Star Pro S7262 stuck at booting animation after Step 10 then go to recovery mode (press and hold the Volume Up, Home and Power buttons together) and perform Wipe data/Factory Reset and Wipe Cache Partition task before selecting reboot system now function. In recovery mode use Volume keys to navigate between options and Power key to select the option. Please note, performing wiping task will erase your device internal memory data and not external SD card data.
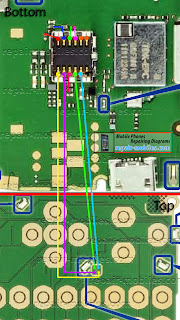
Nokia 1200 light jumper
This is tricks of nokia 1200 light jumper.It is very useful repair solution.It is Alternative solution for nokia 1200 light problem.This solution help you for nokia 1200 light problrms solution without light ic.View below picture and work step by step.
How to do this work : If you have a nokia 1200 phone light problem.then you can apply this solution.This is the Alternative way to repair light problem of nokia 1200.First remove light ic and transistor and resistor next remove one led light next make red and yellow mark jumper.
Sunday, September 21, 2014


How to Install Android 4 3 UBUGMK6 JB Firmware on Galaxy S3 I9300
Samsung has now launched Android 4.3 Jelly Bean is UBUGMK6 official firmware update for the Galaxy S3 GT-I9300. Updates the firmware was launched in various countries including Brazil one of them, and also can be downloaded for a manual update. This new firmware update just brings bug fixes and performance tweaks on the Galaxy S3 GT-I9300 you. Well right Keep reading this guide to learn further how to get an official stock Android 4.3 Jelly Bean I9300UBUGMK6 firmware running on the Galaxy S3 GT-I9300. Almost all possible ways in this alloy to update your device to this firmware discussed here. One thing to note that the official firmware flashing or installing the recovery kernel root access you will fail, in short it will unroot.

I9300UBUGMK6 Android 4.3 Jelly Bean firmware stok tersedia di kedua OTA dan Kies mengupdate. Namun, jika Anda tidak bisa mendapatkannya dari sana maka Anda bisa selalu menyala I9300UBUGMK6 Android 4.3 Jelly Bean firmware pada Galaxy S3 GT-I9300 manual. Kami akan membicarakan semua metode pembaruan yang tersedia. Anda harus selalu mencoba OTA atau metode Kies pertama dan ketika kedua metode tidak bekerja maka hanya mencoba flashing manual.
Warning: This tutorial is only for Galaxy S3 GT-I9300. Don’t try this guide on any other Android device. Also, we are not responsible for any damage caused due to the instruction given in this page. Try this at your own risk. However, it is very unlikely that your device will be damaged if you follow all the instructions as it is which are mentioned in procedure.
Pre Requisites:
Though official firmware restore all existing data but we recommend to back up your data first before proceeding to avoid any uncomfortable situation such as bootloop fix.
1. Backup your device data.
2. Make sure your device have at least 60% battery power. You can install an app like Battery Notifier BT Free on your Android device to check it easily.
3. You already have USB Driver Installed for Galaxy S3 GT-I9300 in your PC. Download USB Drivers
4. Make sure USB Debugging is enabled otherwise you won’t able to transfer file between PC and Galaxy
S3 GT-I9300.How To Update Galaxy S3 GT-I9300 via OTA
- First of all make sure you have stable internet connection (Wi-Fi or data network) on your device.
- Now, go to Android app drawer and then select Settings.
- Then locate About Device and tap on it.
- Next select Software update from About device Lcd.
- Then tap on Update option.
- You should see an update, press OK to download and install. (Remember, download using 3G or network data will incur additional charges to your phone bill!)
- Soon your device will reboot to complete the installation process.
How To Update Galaxy S3 GT-I9300 via Kies
- Make sure you have stable internet connection on your computer.
- Now download and install Samsung Kies on your computer.
- Turn on your device (if it off) and then connect it to computer with USB cable.
- Run Samsung Kies and wait for it to detect your device.
- You should see a New Firmware Upgrade is available at Samsung Kies home Lcd.
- Press the Firmware Upgrade button to proceed.
- Follow on Lcd instruction and soon you will see your device running upgrade and reboot automatically. Once done, you can disconnect your device from computer.
Again! If you see “This is the latest firmware” in Samsung Kies, then your device yet to receive the latest update on Kies. Its good time to go for manual update instruction that located below.
I9300UBUGMK6 Android 4.3 Jelly Bean Firmware Details:
PDA: I9300UBUGMK6
CSC: I9300ZTOUGMK3
Download: I9300UBUGMK6 I9300ZTOUGMK3_ZTO.zip
Please Note: After flashing this firmware you will lost any installed custom ROM including CM10.2, AOKP, Avatar,Beanstalk, Omni ROM, Slim ROM, Pac-Man, Paranoid Android, LiquidSmooth or Carbon.
How To Install I9300UBUGMK6 Android 4.3 Jelly Bean On Galaxy S3 GT-I9300 Manually
- Download Odin v3.09.
- Extract Firmware zip file that you downloaded earlier from above link, you will get a .tar.md5 file and some other files (optional).
- Extract Odin zip file and you will get Odin3 v3.09.exe along with few other files.
- Power off your Android device. Wait 5-6 seconds for vibration to confirm complete switch off.
- Now, put the Galaxy S3 GT-I9300 in Download Mode by pressing and holding down the Home & Volume Down button together while pressing the Power button. A warning Lcd will come up; press Volume Up button to enter Download Mode.
- Now run Odin3 v3.09.exe (see Step 3) as an Administrator because Admin privileges is required to complete the process smoothly (only applicable Windows Vista and higher).
- Now connect your device to your PC using USB cable. An “Added!!” massage will appear in Odin’s message box. If you don’t get the same then you should try another USB port (try USB port located in back in your desktop PC). If that too don’t work then you should reinstall the driver. If you successfully see the “Added!!” message in Odin then you are ready to go in next step. You should also see COM port with a number in Yellow if you successfully added your device.
- Click the AP Button, and select that .tar.md5 file that you get in Step 2.
- In Odin window, make sure only Auto Reboot and F. Reset Time checkboxes are selected.
- Double check everything that we mentioned in Step 8 & Step 9 above. Now, once satisfied hit the START button to begin the flashing process.
- Once flashing completed, your Galaxy S3 GT-I9300 will restart and soon you will see a PASS message with green background in the left-most box at the very top of the Odin. You can now unplug the USB cable to disconnect your device from computer.
Fix Boot Loop Issue On Galaxy S3 GT-I9300
If Galaxy S3 GT-I9300 stuck at booting animation for more than 10 minutes after Step 11 then follow below instructions:
- Go to recovery mode. To do so, press and hold the Volume Up, Home and Power buttons together.
- Now perform Wipe data/Factory Reset and Wipe Cache Partition task before selecting reboot system now function. In recovery mode use Volume keys to navigate between options and Power key to select the option.
That’s it! Let us know about your latest Android 4.3 Jelly Bean experience. visit and get more info ....
Saturday, September 20, 2014


Asha 302 Mic how to fix problem Ways
This acticle is for Nokia Asha 302 Mic Problem Solution. If your phones microphone has stopped working consult the digram in this article to solve this problem and have your Nokia Asha 302 Microphone working again.
After making sure that a faulty microphone is not causing this issue move on and make the jumpers as shown in this diagram. Nokia Asha 302 Mics 1st jumper point goes to R2116 the 2nd one is ground. The 3rd point goes to C2115 & R2117 at the same time and finally the 4th one goes to R2115.
Please Note that we will edit these solutions or add new ones if found in this page at any time in the future. So feel free to come back any time on this page to stay up to date.
If you have further Questions please dont hesitate to leave a comment.
Note: Every repairing solution posted here is tested by at least one member of our team. Use the information available here at Your Own Risk. We are not responsible if any harm comes to your device during the repairing process.
NOKIA N95 N73 N71 N76 EXX N80 N92 N93 virus Guard

NOKIA N95/N73/N71/N76/EXX/N80/N92/N93 virus Guard Download,
Samsung i9003 insert Sim Ways Jumper fix problem

Friday, September 19, 2014
How to Root Your Samsung Galaxy Note 2 Canadian SGH I317M on Android 4 3 Jelly Bean Firmware Guide
Samsung Galaxy Note 2 (Canadian) SGH-I317M users who have already updated their devices with Android 4.3 Jelly Bean, may root their devices using the tutorial below.
This tutorial uses CF-Auto-Root file released by Elite Recognized XDA-Developers, Chainfire. The CF-Auto-Root file allowing Galaxy Note 2 users to root their devices easily without depending on the firmware. It completely supports Android 4.3 Jelly Bean and future firmware as well. Head over to the CF-Auto-Root main thread to learn more about the root method.
Disclaimer: Rooting voids the warranty of your device. We and the developer of this rooting procedures shall not be held responsible if any undesirable outcomes may happen to your device. use of this root guide is solely at your own risk!
Pre-requisites
1. Install USB Driver for Samsung Galaxy Note 2 on the computer.
2. Enable USB Debugging Mode on the phone by navigating to Settings >> Developer Options.
3. Make a backup of all your important data before following the guide.
4. Ensure the battery of the phone is charged more than 80 percent.
5. The CF-Auto-Root file works only on the Canadian version of the Samsung Galaxy Note 2 (SGH-I317M) - Rogers, Bell, Telus, Virgin Mobile, Koodo, Fido, SaskTel. Applying this to any incorrect variant might brick the device. Verify the model number of the Galaxy Note 2 by navigating to Settings >> About Phone.
Files Required
1. CF-Auto-Root (Mirror Link) for Galaxy Note 2 (Canadian) SGH-I317M (CF-Auto-Root-t0ltecan-t0ltevl-sghi317m.zip)
2. Odin v3.09. (Mirror Link)
Steps to Root Galaxy Note 2 (Canadian) SGH-I317M Running on Android 4.3 Jelly Bean Firmware
Step 1: Extract CF-Auto-Root and Odin 3.07 files using WinRAR/7-Zip/WinZip or any other extracting tool.
Step 2: Switch off the Galaxy Note 2. Then boot the device into Download Mode by pressing and holding Volume Down, Home and Power buttons together until a construction Android robot icon with a warning triangle appears on Lcd. Now press the Volume Up button to enter Download Mode.
Step 3: Launch Odin on the computer as an Administrator.
Step 4: Connect the Galaxy Note 2 to the computer using USB cable while it is in the Download Mode. Wait until Odin detects the device. When the device is connected successfully, the ID: COM box will turn to light blue with the COM port number. Additionally, the successful connected will be indicated by a message saying Added.
Note: If the Added message does not appear, then try re-install USB drivers or changing the port on the computer.
Step 5: In Odin, click the PDA button and select the CF-Auto-Root-t0ltecan-t0ltevl-sghi317m.tar.md5 file.
Step 6: Verify that Auto Reboot and F. Reset Time checkboxes are selected in Odin. Also, ensure the Re-Partition option is NOT selected.
Step 7: Double-check and click Start button in Odin. The installation process will now begin.
Step 8: Once the installation process is completed, your phone will restart and soon you will see a PASS message with green background in the left-most box at the very top of the Odin. You can now unplug the USB cable to disconnect your device from the computer.
Samsung Galaxy Note 2 (Canadian) SGH-I317M running on Android 4.3 Jelly Bean firmware is now rooted successfully. You can now install any app that requires root permission. Verify the root status of the device by downloading Root Checker app from Google Play Store.
Thanks to all fellas at XDA who first tried out this rooting technique. This method was originally posted via XDA-Developers original thread.
How to Backup you device
All about Android-Series
Samsung Galaxy S3 - GT-I9300Part 2 -
How to Backup you device
Now that we have gotten fairly good at flashing Custom ROM, the biggest challenge we face is to restore all the application and application data we had earlier on our phone before going flash happy. It is often a very cumbersome task to download all you apps again from the PlayStore and the irritation goes to another level if we are in the midst of playing a big game and had completed 20 levels out of 22.
Once we do a Factory Reset/Data Wipe from the recovery menu all our saved data is lost and hence the Games and Apps.
In this blog I will update you on how to backup your device, your data and your apps effectively.
- Backing up your device
Once you have CWM installed, reboot into Recovery by pressing and holding Volume Up+Power+Home buttons together, release the buttons only when you see the Recovery Menu come on the Lcd.
Navigate to Backup and Recovery, Choose Backup from here.
This option will then backup all the system files, apps, app data and settings which you have on your device. There are two things which are not backed up here:
- Your data on Internal/External Sdcard
- Your Modem or Radio
To Restore this backup just navigate again to backup and restore option in CWM recovery. Choose Restore option from here and Select the Backup you want to restore.
This is also known as Nandroid Backup
2. Backing up your Applications and Application Data
Performing a Nandroid backup will not be useful if you want to try out a new ROM, as all the applications will be in the Nandroid backup and restore it you will have to restore the complete backup.
The best option here is to use Titanium Backup Application from the PlayStore. Get this app from here.
You will need to be rooted to use this application.
Now to backup your apps, fire up this application and grant it Superuser permissions.
It will show you all the apps which are not backed up. Choose the option of backing up all the apps with data.
It backs up all the apps and data on your internal sdcard.
Now after flashing a Custom ROM/New ROM you can restore all your applications to the same state by again going in TB and clicking restore all apps with data.
It is advisable that you dont restore System Apps and System Data if you have moved onto a different ROM, otherwise you will end up in Force Closes and unresponsive system.
3. Backing your SMSes
Another important data which we dont want to loose are our SMSes. To backup the SMSes we will use another application knows as SMS Backup and Restore. Get it from the PlayStore from here.
Open up the Application and click Backup. It will ask you for a name, give the backup a name preferably with a date. Now, you also have an option to save this backup in your dropbox account along with the SDcard. For it you will have to download an additional add-on for this app from here.
Once you have to add-on installed, navigate to Preferences>Backup Settings and Configure your Dropbox account here. Check that the Upload to Dropbox option is ticked. You can also configure a schedule for it to do the backups automatically and at the same time uploading it to Dropbox.
4. Backup Contacts
This is already done by Google and all your contacts get backed in your Google account automatically.
Just ensure that you have added a Google account in your phone and the sync option is turned On.
I hope after following all these steps your are fairly protected against any misfortunes and can go and flash as many ROMs as you want.
Enjoy the Android Goodnes !!
Samsung E2252 Blinking problem solved with test Report
Samsung E2252 Blinking problem solve this method
![E2252]()
Read More..
Samsung Champ Duos E2652W factory reset
Warning! All data will be lost!
Just type *2767*3855#
Wait until the phone restarts.
Here is video how to do:
Thursday, September 18, 2014
Nokia Asha 305 factory reset
Warning! All data will be lost!
Power on your phone
Just type *#7370#
Type security code 12345
Wait until the phone restarts
Asha 302 Camera Problem Ways Solution
Solution in this article is for Nokia Asha 302 Camera Problem. If your Nokia Asha 302 Camera is not working or you have a busted camera connector use the diagram in this article to solve this problem.
I have marked all the camera connector legs jumper points that I could find in this diagram. Please before doing any of these jumpers make sure that a faulty camera module is not causing this problem. The first leg marked with Red jumper is connected to C1483, second marked with Blue is connected to C1484 and C1485 at the same time. Third marked with Green goes to J1400 and 4th goes to J1401. 5th and 6th marked with Orange I could not trace sorry but the jumpers of the those legs are not available at the time. I will keep it in my checklist though as soon as I am able to trace them I will update the diagram or post a new diagram here.
Moving on to the other side of the camera connector of Nokia Asha 302 the 7th leg marked with black as you might have already judged is ground. Leg No. 8,9,11 & 12 go the jumpers points on the front of the motherboard right between Navigation Down and Power Button. 8th is connected to J1480, 9th is connected to J1482, 11th is connected to J1484 & 12th is connected to J1486. Now the final the 10th leg is connected to C1487 and C1486 at the same time which are placed right next to the 10th leg of the Nokia Asha 302 Camera Connector. That about covers all the camera connector jumpers points I could find. I hope this will be helpful to you.
Please Note that we will edit these solutions or add new ones if found in this page at any time in the future. So feel free to come back any time on this page to stay up to date.
If you have further Questions please dont hesitate to leave a comment.
Note: Every repairing solution posted here is tested by at least one member of our team. Use the information available here at Your Own Risk. We are not responsible if any harm comes to your device during the repairing process.

Subscribe to:
Posts (Atom)