Showing posts with label asha. Show all posts
Showing posts with label asha. Show all posts
Tuesday, January 6, 2015
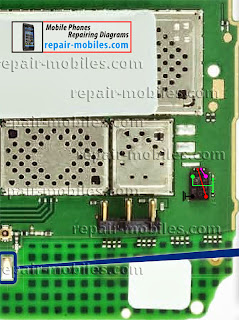
nokia Asha 200 key paid solution final
 Nokia Asha 200 Key paid solution. Just remove the shown ic( key paid is ) and make the jumper like 3110c or 6300 key paid ic it is same You can also use new key paid ic & the compatible ic is 3110c,6300 key paid is these same just nokia company has changed the ic nos
Thursday, November 13, 2014
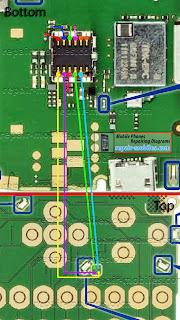
Nokia asha 200 Battery Terminal Points Damage Ways Problem Solution
Nokia Asha 200 Battery Terminal Points Damage Ways Problem Solution if in Nokia Asha 200 during changing battery terminal points you have loss battery points then you can solve this problem with this diagram bellow posted in this post.

there are three different color lines in this post shows that how you can make jumpers so check these links with meter and if any of them is broken make these jumpers with insulation wire.this diagram can help you in case Nokia Asha 200 is dead you can check these links so that battery crunt can pass through right ways and can be set on off.
for more detail and new tips and tricks about this problem keep visiting this page we will update it timely with new diagrams.some related post are also given bellow you can read them also for more information.
Wednesday, November 5, 2014
Nokia Asha 300 Power button On Off Switch Ways Jumpers Dead Problem Solution
Some time nokia asha 300 can be dead due to on off button problem. If on off button is not working in nokia asha 300 then it can not power on. So to solve this problem we have to follow a few steps that are given bellow and have to follow diagram bellow also.

Nokia Asha 300 Power button On Off Switch Ways Jumpers Dead Problem Solution To check that it is button fault we can make a simple test plug in charger and check is it working in off mode if you can see nokia asha 300 is charging ok in off mode then it means set is not totally dead. And problem is only that mobile can not become power on.
So remove key pad striker and check is there any rust carbon or water damage on off button if yes clean it and change the push of button. Check links with meter and if on off button does not show value outer is a ground you can apply jumper on any ground print. While inner is a positive print and going to resistance back of mother board. Apply jumper as shown in diagram in red color.
Tuesday, November 4, 2014
Nokia Asha 311 usb not detected problem can be solved
this image is useful to solve the usb detecting problem in nokia Asha 311 so check these parts that are indicated in red lines in image.clean this area and leave it to dry for a few mints.resold these parts and if problem is not solve then you may have to replace these parts also.

these parts are used in usb charging and data mas storage functioning.so if your Nokia Asha 311 show errors in charging with usb or mass storage you can re hot or resold these parts that are shown in the diagram encircled in red lines.you may have to change these components if Nokia Asha 311 usb charging prob not solved with only resold ding these components.
for more detail and new tips and tricks about this problem keep visiting this page we will update it timely with new diagrams.some related post are also given bellow you can read them also for more information.
Thursday, October 16, 2014
Nokia Asha 203 Mic problem solution jumper ways
Nokia asha 203 mic problem, Low voice in nokia asha 203, Mic is not working in nokia asha 203.All these mic faults can be solve with a few simple steps that I am posting in this post.A mic repairing diagram for nokia asha 203 is also attached with this post.Nokia Asha 203 Ringer problem solution ways

If you find som carbon or water damages in the mother board. Clean these parts with electronics cleaner and apply heat with hot air to make it dry. Much heat can damage the nokia asha 203 mother board.
In diagram above you can see two different color lines these lines are given to identify components that are used in mic function of nokia asha 203.Check all these tracks with meter and if any link is break apply jumpers as given in nokia asha 203 mic repairing diagram above.
for more detail and new tips and tricks about cellphone service problem keep visiting this page we will update cellphone service diagrams timely with new cellphone diagrams.some related post are also given bellow you can read them also for more information about cellphone.
Monday, September 22, 2014
Nokia asha 206 display ways problem jumper solution
This is the solution of nokia asha 206 display problems and lcd ways problems.May be some time it has damage display ways normally or water damage then phones display has problem.So I create this solution for that problem.Some time this phone has white Lcd then you can repair using this solution.
![Nokia]()
Saturday, September 20, 2014
Asha 302 Mic how to fix problem Ways
This acticle is for Nokia Asha 302 Mic Problem Solution. If your phones microphone has stopped working consult the digram in this article to solve this problem and have your Nokia Asha 302 Microphone working again.
After making sure that a faulty microphone is not causing this issue move on and make the jumpers as shown in this diagram. Nokia Asha 302 Mics 1st jumper point goes to R2116 the 2nd one is ground. The 3rd point goes to C2115 & R2117 at the same time and finally the 4th one goes to R2115.
Please Note that we will edit these solutions or add new ones if found in this page at any time in the future. So feel free to come back any time on this page to stay up to date.
If you have further Questions please dont hesitate to leave a comment.
Note: Every repairing solution posted here is tested by at least one member of our team. Use the information available here at Your Own Risk. We are not responsible if any harm comes to your device during the repairing process.
Thursday, September 18, 2014
Nokia Asha 305 factory reset
Warning! All data will be lost!
Power on your phone
Just type *#7370#
Type security code 12345
Wait until the phone restarts
Asha 302 Camera Problem Ways Solution
Solution in this article is for Nokia Asha 302 Camera Problem. If your Nokia Asha 302 Camera is not working or you have a busted camera connector use the diagram in this article to solve this problem.
I have marked all the camera connector legs jumper points that I could find in this diagram. Please before doing any of these jumpers make sure that a faulty camera module is not causing this problem. The first leg marked with Red jumper is connected to C1483, second marked with Blue is connected to C1484 and C1485 at the same time. Third marked with Green goes to J1400 and 4th goes to J1401. 5th and 6th marked with Orange I could not trace sorry but the jumpers of the those legs are not available at the time. I will keep it in my checklist though as soon as I am able to trace them I will update the diagram or post a new diagram here.
Moving on to the other side of the camera connector of Nokia Asha 302 the 7th leg marked with black as you might have already judged is ground. Leg No. 8,9,11 & 12 go the jumpers points on the front of the motherboard right between Navigation Down and Power Button. 8th is connected to J1480, 9th is connected to J1482, 11th is connected to J1484 & 12th is connected to J1486. Now the final the 10th leg is connected to C1487 and C1486 at the same time which are placed right next to the 10th leg of the Nokia Asha 302 Camera Connector. That about covers all the camera connector jumpers points I could find. I hope this will be helpful to you.
Please Note that we will edit these solutions or add new ones if found in this page at any time in the future. So feel free to come back any time on this page to stay up to date.
If you have further Questions please dont hesitate to leave a comment.
Note: Every repairing solution posted here is tested by at least one member of our team. Use the information available here at Your Own Risk. We are not responsible if any harm comes to your device during the repairing process.
Friday, September 12, 2014
Nokia Asha 301 Tips and Tricks
How to Copy Content from Your Old Phone
Use this feature to transfer your contacts, calendar, and other stuff to your new phone.
1. Switch Bluetooth on in both phones.
2. On your Nokia Asha 301, select settings and sync & backup > phone switch.
3. Select copy to this and what you want to copy, then select the check icon.
4. Select your old phone from the list of found devices.
5. Then just follow the instructions shown on both phones.
How to Personalise the Main Menu
Organize your apps on your main menu as you like. For the quick access of your favourites apps, move them to the top.
1. Tap and hold the main menu.
2. Select the app you want to move, then tap where you want to move it.
How to Add a Shortcut to My Screen
You can add shortcuts to improve the productivity in using your phone. Add shortcuts directly on your My Lcd.
1. Tap and hold My Lcd, and select plus icon shortcut.
2. Select an item, such as a widget or action, and select the check icon.
How to Remove a Shortcut
Tap and hold My Lcd, and select the X mark icon on the shortcut you want to remove.
How to Factory Reset
You can reset your phone settings once you notice some abnormalities of your phone.
1. End all calls and connections.
2. Select settings and restore factory sett. > settings only.
3. Type in the security code.
This does not affect documents or files stored on your phone. It may take several minutes before your phone restore to default settings.
Back up content to a Memory Card
1. Select settings > sync & backup.
2. Select create backup.
3. Select what you want to back up, then select the check icon.
Restore a backup
Select restore backup and what you want to restore, then select the check icon.
.
Format a Memory Card
1. Select files.
2. Tap and hold the memory card, then select mem. card options.
3. Select format mem. card.
Password Protect Your Memory Card
1. Select files.
2. Tap and hold the memory card, then select mem. card options.
3. Select set password, then type in a password.
Keep the password secret and in a safe place, separate from the memory card.
Read More..
Use this feature to transfer your contacts, calendar, and other stuff to your new phone.
1. Switch Bluetooth on in both phones.
2. On your Nokia Asha 301, select settings and sync & backup > phone switch.
3. Select copy to this and what you want to copy, then select the check icon.
4. Select your old phone from the list of found devices.
5. Then just follow the instructions shown on both phones.
How to Personalise the Main Menu
Organize your apps on your main menu as you like. For the quick access of your favourites apps, move them to the top.
1. Tap and hold the main menu.
2. Select the app you want to move, then tap where you want to move it.
How to Add a Shortcut to My Screen
You can add shortcuts to improve the productivity in using your phone. Add shortcuts directly on your My Lcd.
1. Tap and hold My Lcd, and select plus icon shortcut.
2. Select an item, such as a widget or action, and select the check icon.
How to Remove a Shortcut
Tap and hold My Lcd, and select the X mark icon on the shortcut you want to remove.
How to Factory Reset
You can reset your phone settings once you notice some abnormalities of your phone.
1. End all calls and connections.
2. Select settings and restore factory sett. > settings only.
3. Type in the security code.
This does not affect documents or files stored on your phone. It may take several minutes before your phone restore to default settings.
Back up content to a Memory Card
1. Select settings > sync & backup.
2. Select create backup.
3. Select what you want to back up, then select the check icon.
Restore a backup
Select restore backup and what you want to restore, then select the check icon.
.
Format a Memory Card
1. Select files.
2. Tap and hold the memory card, then select mem. card options.
3. Select format mem. card.
Password Protect Your Memory Card
1. Select files.
2. Tap and hold the memory card, then select mem. card options.
3. Select set password, then type in a password.
Keep the password secret and in a safe place, separate from the memory card.
Thursday, September 11, 2014
Nokia asha 206 insert sim problem sim jumper solution
This solution will be solve nokia asha 206 sim not work or sim ways damage problem.This phone is two sim first identify which sim not work then repair that sim part following below picture.
![Nokia]()
![Nokia]()
How to do this : When you confirm sim one ore sim two one of them not work then repair that sim part. if both sim not work then first check this sim ways if they are ok but problem still then re-hot sim ic.
Saturday, August 30, 2014
Nokia asha 200 mic problem solution
This picture help you for nokia asha 200 mic not work no sound and mic ways problems repair.just follow this picture.

Friday, August 29, 2014
Tuesday, August 26, 2014
Nokia Asha 300 insert sim Problem with Jumper Solution
Nokia Asha 300 insert sim Problem with Jumper Solution
Nokia Asha 503 RM 947 Latest Version 12 0 23 Flash File Free Download
Nokia Mobile Asha 503 RM-947 Latest Version 12.0.23 Flash File Free Download

Phone Name : Nokia Mobile Asha 503
Product Type : RM-947
Firmware Version : 12.0.23
Variant Id : N/A
Varian Name : RM-947 VAR MX TELCEL 4GB SL
Product Code : 059V380
Product Type : RM-947
Firmware Version : 12.0.23
Variant Id : N/A
Varian Name : RM-947 VAR MX TELCEL 4GB SL
Product Code : 059V380
File Name : RM947_059V380_hwt_v017.bin
File Size : 216 bytes
File Name : rm947_12.0.23_Empty_SD_4GB.cardverref.xml
File Size : 264 bytes
File Name : S40NG_Telcel_MX_sim_lock_V3_simlock_crc6805.sim
File Size : 343 bytes
File Name : RM947_059V380_ccc_v017.bin
File Size : 916 bytes
File Name : RM947_059V380_12.0.23_017.spr
File Size : 1 KiB
File Name : nontz_deviceiapsvctagcertificate_template_production_v12.bin
File Size : 2,43 KiB
File Name : RM947_059V380_12.0.23_017_signature.bin
File Size : 2,6 KiB
File Name : 040116621v1_label_layout.xml
File Size : 4,59 KiB
File Name : RM947_059V380_12.0.23_017.vpl
File Size : 4,68 KiB
File Name : 040116621v1dpi600.pcx
File Size : 11,74 KiB
File Name : RM947_059V380_12.0.23_017.dcp
File Size : 420,89 KiB
File Name : rm947_12.0.2_059T2L9_a1_2057_02_323108.rofs.fls
File Size : 5,07 MiB
File Name : rm947_12.0.23_Empty_SD_4GB.fpsimage.fls
File Size : 8,41 MiB
File Name : rm947_12.0.2_059T2L9_a1_2057_02_323108.image.fls
File Size : 37,36 MiB
File Name : rm920_12.0.23.mcusw.fls
File Size : 37,4 MiB
Thursday, August 14, 2014
Asha 302 Battery Connector Ways how to fix problem
In this post I have marked Nokia Asha 302 Battery Connector ways jumpers points. If you have damaged Nokia Asha 302 Battery Connector prints make

If you have further Questions please dont hesitate to leave a comment.
Note: Every repairing solution posted here is tested by at least one member of our team. Use the information available here at Your Own Risk. We are not responsible if any harm comes to your device during the repairing process.
Sunday, August 10, 2014
Nokia asha 200 all hardware problems solution
This is nokia asha 200 all hardware problem solution.those are nokia asha 200 charging problems solution,nokia asha 200 mic problems solution lcd light problem solution,lcd ways,ear speaker problems solution.

Nokia asha 200 mic problem solution
Nokia asha 206 insert sim problem jumper solution
Nokia asha 200 light problem ways solution
Nokia asha 200 charging problem solution
Subscribe to:
Posts (Atom)