The Canadian version of the Samsung Galaxy Note 2 with model number SGH-I317M has officially received the Android 4.3 Jelly Bean update. The new official firmware is now available as an Over-The-Air (OTA) update as well as through Samsung KIES.
Samsung Galaxy Note 2 (Canadian) SGH-I317M users who have already updated their devices with Android 4.3 Jelly Bean, may root their devices using the tutorial below.
This tutorial uses CF-Auto-Root file released by Elite Recognized XDA-Developers, Chainfire. The CF-Auto-Root file allowing Galaxy Note 2 users to root their devices easily without depending on the firmware. It completely supports Android 4.3 Jelly Bean and future firmware as well. Head over to the CF-Auto-Root main thread to learn more about the root method.
Disclaimer: Rooting voids the warranty of your device. We and the developer of this rooting procedures shall not be held responsible if any undesirable outcomes may happen to your device. use of this root guide is solely at your own risk!
Pre-requisites
1. Install USB Driver for Samsung Galaxy Note 2 on the computer.
2. Enable USB Debugging Mode on the phone by navigating to Settings >> Developer Options.
3. Make a backup of all your important data before following the guide.
4. Ensure the battery of the phone is charged more than 80 percent.
5. The CF-Auto-Root file works only on the Canadian version of the Samsung Galaxy Note 2 (SGH-I317M) - Rogers, Bell, Telus, Virgin Mobile, Koodo, Fido, SaskTel. Applying this to any incorrect variant might brick the device. Verify the model number of the Galaxy Note 2 by navigating to Settings >> About Phone.
Files Required
1. CF-Auto-Root (Mirror Link) for Galaxy Note 2 (Canadian) SGH-I317M (CF-Auto-Root-t0ltecan-t0ltevl-sghi317m.zip)
2. Odin v3.09. (Mirror Link)
Steps to Root Galaxy Note 2 (Canadian) SGH-I317M Running on Android 4.3 Jelly Bean Firmware
Step 1: Extract CF-Auto-Root and Odin 3.07 files using WinRAR/7-Zip/WinZip or any other extracting tool.
Step 2: Switch off the Galaxy Note 2. Then boot the device into Download Mode by pressing and holding Volume Down, Home and Power buttons together until a construction Android robot icon with a warning triangle appears on Lcd. Now press the Volume Up button to enter Download Mode.
Step 3: Launch Odin on the computer as an Administrator.
Step 4: Connect the Galaxy Note 2 to the computer using USB cable while it is in the Download Mode. Wait until Odin detects the device. When the device is connected successfully, the ID: COM box will turn to light blue with the COM port number. Additionally, the successful connected will be indicated by a message saying Added.
Note: If the Added message does not appear, then try re-install USB drivers or changing the port on the computer.
Step 5: In Odin, click the PDA button and select the CF-Auto-Root-t0ltecan-t0ltevl-sghi317m.tar.md5 file.
Step 6: Verify that Auto Reboot and F. Reset Time checkboxes are selected in Odin. Also, ensure the Re-Partition option is NOT selected.
Step 7: Double-check and click Start button in Odin. The installation process will now begin.
Step 8: Once the installation process is completed, your phone will restart and soon you will see a PASS message with green background in the left-most box at the very top of the Odin. You can now unplug the USB cable to disconnect your device from the computer.
Samsung Galaxy Note 2 (Canadian) SGH-I317M running on Android 4.3 Jelly Bean firmware is now rooted successfully. You can now install any app that requires root permission. Verify the root status of the device by downloading Root Checker app from Google Play Store.
Thanks to all fellas at XDA who first tried out this rooting technique. This method was originally posted via XDA-Developers original thread.
Thursday, October 2, 2014
Sunday, September 21, 2014
How to Install Android 4 3 UBUGMK6 JB Firmware on Galaxy S3 I9300
Samsung has now launched Android 4.3 Jelly Bean is UBUGMK6 official firmware update for the Galaxy S3 GT-I9300. Updates the firmware was launched in various countries including Brazil one of them, and also can be downloaded for a manual update. This new firmware update just brings bug fixes and performance tweaks on the Galaxy S3 GT-I9300 you. Well right Keep reading this guide to learn further how to get an official stock Android 4.3 Jelly Bean I9300UBUGMK6 firmware running on the Galaxy S3 GT-I9300. Almost all possible ways in this alloy to update your device to this firmware discussed here. One thing to note that the official firmware flashing or installing the recovery kernel root access you will fail, in short it will unroot.
I9300UBUGMK6 Android 4.3 Jelly Bean firmware stok tersedia di kedua OTA dan Kies mengupdate. Namun, jika Anda tidak bisa mendapatkannya dari sana maka Anda bisa selalu menyala I9300UBUGMK6 Android 4.3 Jelly Bean firmware pada Galaxy S3 GT-I9300 manual. Kami akan membicarakan semua metode pembaruan yang tersedia. Anda harus selalu mencoba OTA atau metode Kies pertama dan ketika kedua metode tidak bekerja maka hanya mencoba flashing manual.
Warning: This tutorial is only for Galaxy S3 GT-I9300. Don’t try this guide on any other Android device. Also, we are not responsible for any damage caused due to the instruction given in this page. Try this at your own risk. However, it is very unlikely that your device will be damaged if you follow all the instructions as it is which are mentioned in procedure.
Pre Requisites:
Though official firmware restore all existing data but we recommend to back up your data first before proceeding to avoid any uncomfortable situation such as bootloop fix.
1. Backup your device data.
2. Make sure your device have at least 60% battery power. You can install an app like Battery Notifier BT Free on your Android device to check it easily.
3. You already have USB Driver Installed for Galaxy S3 GT-I9300 in your PC. Download USB Drivers
4. Make sure USB Debugging is enabled otherwise you won’t able to transfer file between PC and Galaxy
S3 GT-I9300.How To Update Galaxy S3 GT-I9300 via OTA
- First of all make sure you have stable internet connection (Wi-Fi or data network) on your device.
- Now, go to Android app drawer and then select Settings.
- Then locate About Device and tap on it.
- Next select Software update from About device Lcd.
- Then tap on Update option.
- You should see an update, press OK to download and install. (Remember, download using 3G or network data will incur additional charges to your phone bill!)
- Soon your device will reboot to complete the installation process.
How To Update Galaxy S3 GT-I9300 via Kies
- Make sure you have stable internet connection on your computer.
- Now download and install Samsung Kies on your computer.
- Turn on your device (if it off) and then connect it to computer with USB cable.
- Run Samsung Kies and wait for it to detect your device.
- You should see a New Firmware Upgrade is available at Samsung Kies home Lcd.
- Press the Firmware Upgrade button to proceed.
- Follow on Lcd instruction and soon you will see your device running upgrade and reboot automatically. Once done, you can disconnect your device from computer.
Again! If you see “This is the latest firmware” in Samsung Kies, then your device yet to receive the latest update on Kies. Its good time to go for manual update instruction that located below.
I9300UBUGMK6 Android 4.3 Jelly Bean Firmware Details:
PDA: I9300UBUGMK6
CSC: I9300ZTOUGMK3
Download: I9300UBUGMK6 I9300ZTOUGMK3_ZTO.zip
Please Note: After flashing this firmware you will lost any installed custom ROM including CM10.2, AOKP, Avatar,Beanstalk, Omni ROM, Slim ROM, Pac-Man, Paranoid Android, LiquidSmooth or Carbon.
How To Install I9300UBUGMK6 Android 4.3 Jelly Bean On Galaxy S3 GT-I9300 Manually
- Download Odin v3.09.
- Extract Firmware zip file that you downloaded earlier from above link, you will get a .tar.md5 file and some other files (optional).
- Extract Odin zip file and you will get Odin3 v3.09.exe along with few other files.
- Power off your Android device. Wait 5-6 seconds for vibration to confirm complete switch off.
- Now, put the Galaxy S3 GT-I9300 in Download Mode by pressing and holding down the Home & Volume Down button together while pressing the Power button. A warning Lcd will come up; press Volume Up button to enter Download Mode.
- Now run Odin3 v3.09.exe (see Step 3) as an Administrator because Admin privileges is required to complete the process smoothly (only applicable Windows Vista and higher).
- Now connect your device to your PC using USB cable. An “Added!!” massage will appear in Odin’s message box. If you don’t get the same then you should try another USB port (try USB port located in back in your desktop PC). If that too don’t work then you should reinstall the driver. If you successfully see the “Added!!” message in Odin then you are ready to go in next step. You should also see COM port with a number in Yellow if you successfully added your device.
- Click the AP Button, and select that .tar.md5 file that you get in Step 2.
- In Odin window, make sure only Auto Reboot and F. Reset Time checkboxes are selected.
- Double check everything that we mentioned in Step 8 & Step 9 above. Now, once satisfied hit the START button to begin the flashing process.
- Once flashing completed, your Galaxy S3 GT-I9300 will restart and soon you will see a PASS message with green background in the left-most box at the very top of the Odin. You can now unplug the USB cable to disconnect your device from computer.
Fix Boot Loop Issue On Galaxy S3 GT-I9300
If Galaxy S3 GT-I9300 stuck at booting animation for more than 10 minutes after Step 11 then follow below instructions:
- Go to recovery mode. To do so, press and hold the Volume Up, Home and Power buttons together.
- Now perform Wipe data/Factory Reset and Wipe Cache Partition task before selecting reboot system now function. In recovery mode use Volume keys to navigate between options and Power key to select the option.
That’s it! Let us know about your latest Android 4.3 Jelly Bean experience. visit and get more info ....
Friday, September 19, 2014
Thursday, September 11, 2014
How To Guide Install UBUEMK4 Android 4 3 JB Firmware on Galaxy Note 2 N7100
Samsung has just launched the Android 4.3 Jelly Bean UBUEMK4 official firmware update for Galaxy Note GT - N7100 2 . This firmware update has been released in various countries , including one of her Brazil and the Dominican Republic , and also can be downloaded for manual updates . You can also update your device firmware via Kies or OTA update . Because of this smartphone comes equipped with Jelly Bean Android 4.1.2 out of the box , this new firmware update will upgrade your smartphone to the OS which is certainly better that Android 4.3 Jelly Bean . Well Continue reading this guide to learn more about how to get an official stock Android 4.3 Jelly Bean N7100UBUEMK4 firmware that runs on the Galaxy Note GT - N7100 2 . Almost all the possible ways to update your device to this firmware discussed here . and the need to remember or One thing should be noted that the flashing or installing the official firmware kernel then restore your root access will be canceled , in short it will unroot it .
Android 4.3 Jelly Bean N7100UBUEMK4 stock firmware available in both OTA and Kies update. However, if you can not get it from there then you can always blink N7100UBUEMK4 Android 4.3 Jelly Bean firmware on Galaxy Note GT-N7100 manual 2. We will discuss all the methods available updates. You should always try OTA or Kies method first and when the two methods do not work then just try flashing manually.
Pre Requisites:
Though official firmware restore all existing data but we recommend to back up your data first before proceeding to avoid any uncomfortable situation such as bootloop fix.
1. Backup your device data.
2. Make sure your device have at least 60% battery power. You can install an app like Battery Notifier BT Free on your Android device to check it easily.
3. You already have USB Driver Installed for Galaxy Note 2 GT-N7100 in your PC.Download USB Drivers
4. Make sure USB Debugging is enabled otherwise you won’t able to transfer file between PC and Galaxy Note 2 GT-N7100.
Warning: This tutorial is only for Galaxy Note 2 GT-N7100. Don’t try this guide on any other Android device. Also, we are not responsible for any damage caused due to the instruction given in this page. Try this at your own risk. However, it is very unlikely that your device will be damaged if you follow all the instructions as it is which are mentioned in procedure.
How To Update Galaxy Note 2 GT-N7100 via OTA
- First of all make sure you have stable internet connection (Wi-Fi or data network) on your device.
- Now, go to Android app drawer and then select Settings.
- Then locate About Device and tap on it.
- Next select Software update from About device Lcd.
- Then tap on Update option.
- You should see an update, press OK to download and install. (Remember, download using 3G or network data will incur additional charges to your phone bill!)
- Soon your device will reboot to complete the installation process.
If you see “The latest update have already been installed” massage while checking update then your device yet to receive an OTA update. Check back within few days or jump to next procedure
.How To Update Galaxy Note 2 GT-N7100 via Kies
- Make sure you have stable internet connection on your computer.
- Now download and install Samsung Kies on your computer.
- Turn on your device (if it off) and then connect it to computer with USB cable.
- Run Samsung Kies and wait for it to detect your device.
- You should see a New Firmware Upgrade is available at Samsung Kies home Lcd.
- Press the Firmware Upgrade button to proceed.
- Follow on Lcd instruction and soon you will see your device running upgrade and reboot automatically. Once done, you can disconnect your device from computer.
Again! If you see “This is the latest firmware” in Samsung Kies, then your device yet to receive the latest update on Kies. Its good time to go for manual update instruction that located below.
Note: You can install any firmware listed below despite availability in other countries, except those which comes with carrier name.
N7100UBUEMK4 Android 4.3 Jelly Bean Firmware Downloads
Please Note: After flashing this firmware you will lost any installed custom ROM including CM10.2, AOKP, Avatar,Beanstalk, Omni ROM, Slim ROM, Pac-Man, Paranoid Android, LiquidSmooth or Carbon.
How To Install N7100UBUEMK4 Android 4.3 Jelly Bean On Galaxy Note 2 GT-N7100 Manually
- Download Odin v3.09.
- Extract Firmware zip file that you downloaded earlier from above link, you will get a .tar.md5 file and some other files (optional).
- Extract Odin zip file and you will get Odin3 v3.09.exe along with few other files.
- Power off your Android device. Wait 5-6 seconds for vibration to confirm complete switch off.
- Now, put the Galaxy Note 2 GT-N7100 in Download Mode by pressing and holding down the Home &Volume Down button together while pressing the Power button. A warning Lcd will come up; press Volume Up button to enter Download Mode.
- Now run Odin3 v3.09.exe (see Step 3) as an Administrator because Admin privileges is required to complete the process smoothly (only applicable Windows Vista and higher).
- Now connect your device to your PC using USB cable. An “Added!!” massage will appear in Odin’s message box. If you don’t get the same then you should try another USB port (try USB port located in back in your desktop PC). If that too don’t work then you should reinstall the driver. If you successfully see the “Added!!” message in Odin then you are ready to go in next step. You should also see COM port with a number in Yellow if you successfully added your device.
- Click the AP Button, and select that .tar.md5 file that you get in Step 2.
- In Odin window, make sure only Auto Reboot and F. Reset Time checkboxes are selected.
- Double check everything that we mentioned in Step 8 & Step 9 above. Now, once satisfied hit the START button to begin the flashing process.
- Once flashing completed, your Galaxy Note 2 GT-N7100 will restart and soon you will see a PASS message with green background in the left-most box at the very top of the Odin. You can now unplug the USB cable to disconnect your device from computer.
Congrats! You just updated your Galaxy Note 2 GT-N7100 to Android 4.3 Jelly Bean firmware. Go to Settings > About device to verify this firmware update.
Fix Boot Loop Issue On Galaxy Note 2 GT-N7100
If Galaxy Note 2 GT-N7100 stuck at booting animation for more than 10 minutes after Step 11 then follow below instructions:
- Go to recovery mode. To do so, press and hold the Volume Up, Home and Power buttons together.
- Now perform Wipe data/Factory Reset and Wipe Cache Partition task before selecting reboot system now function. In recovery mode use Volume keys to navigate between options and Power key to select the option.
Please note, performing wiping task will erase your device internal memory data and not external SD card data.
That’s it! Let us know about your latest Android 4.3 Jelly Bean experience.
Monday, September 1, 2014
Saturday, August 23, 2014
How to Root Galaxy S4 on Leaked Jelly Bean 4 3 Firmware
The Android 4.3 Jelly Bean firmware has been ported to the Samsung Galaxy S4 from the Google Edition of the same device, the update being anytime available for you (you can manually apply the software on your handset). Anyway, those who have installed the JB 4.3 OS on their devices had complained that the root access has been revoked and there is no suitable root solution for the new Android system. Well, now you can easily root your Galaxy S4 on leaked Jelly bean 4.3 ROM as a new version of the Chainfire tool has been made available.
The best is that the new app is working on the Android 4.3 system which means that by using the same you can now safely root your SGS4. So, during the present step by step guide I will show you how to use the Chainfire app for gaining root access, all being explained and detailed below. On this tutorial you will have to use the stock recovery image of your Galaxy S4, as the root package can be flashed by using the same – therefore you have nothing to worry about as you don’t have to install and use complex and risky programs that might damage the system of your device.
The root operation should be applied by those who want to obtain more power and control, because once you apply this method, the factory restrictions and default settings of your Galaxy S4 will be removed. That’s why, on a rooted system and OS you can easily install complex apps that requires root access, remove in built programs for improving the battery life, update with custom ROMs for improving the performances, customize the looks and so on. Furthermore, on a rooted system you can also overclock your Samsung Galaxy S4, this being the perfect method to apply when looking into bumping the speeds and the performances.
Unfortunately, by completing this tutorial the warranty of your smartphone will get lost. As you can tell, this operation is an unofficial one and that’s why you are dealing with this aspect. Anyhow, don’t panic as if you follow this guide, nothing bad will happen. Also, if needed, you can restore the warranty; all you have to do is to downgrade / update your phone to stock / official Android OS. Of course, then the root access will be revoked and the factory restrictions reinstalled.
Use this guide only if your Samsung Galaxy S4 is on leaked Android 4.3 Jelly Bean firmware; else your phone might get bricked or its system damaged. Furthermore, ensure that:
Read More..
The best is that the new app is working on the Android 4.3 system which means that by using the same you can now safely root your SGS4. So, during the present step by step guide I will show you how to use the Chainfire app for gaining root access, all being explained and detailed below. On this tutorial you will have to use the stock recovery image of your Galaxy S4, as the root package can be flashed by using the same – therefore you have nothing to worry about as you don’t have to install and use complex and risky programs that might damage the system of your device.
The root operation should be applied by those who want to obtain more power and control, because once you apply this method, the factory restrictions and default settings of your Galaxy S4 will be removed. That’s why, on a rooted system and OS you can easily install complex apps that requires root access, remove in built programs for improving the battery life, update with custom ROMs for improving the performances, customize the looks and so on. Furthermore, on a rooted system you can also overclock your Samsung Galaxy S4, this being the perfect method to apply when looking into bumping the speeds and the performances.
Unfortunately, by completing this tutorial the warranty of your smartphone will get lost. As you can tell, this operation is an unofficial one and that’s why you are dealing with this aspect. Anyhow, don’t panic as if you follow this guide, nothing bad will happen. Also, if needed, you can restore the warranty; all you have to do is to downgrade / update your phone to stock / official Android OS. Of course, then the root access will be revoked and the factory restrictions reinstalled.
Use this guide only if your Samsung Galaxy S4 is on leaked Android 4.3 Jelly Bean firmware; else your phone might get bricked or its system damaged. Furthermore, ensure that:
- You can use a computer and the phone’s USB cord.
- On the computer there are no security programs running; if different uninstall or deactivate the antivirus, antimalware and Firewall protection.
- On your handset the USB debugging option needs to be enabled; else you won’t be able to connect your device with the computer.
- You should charge the S4 if there is less than 60% power left; else your smartphone might get turned off and bricked, while you are trying to root its JB 4.3 software.
- Backup the SGS4 data because it might get corrupted – you won’t be able to use it after rooting the internal system.
- So, make sure you save everything that’s important to you, along with the EFS folder and internet settings.
Root Samsung Galaxy S4 on Leaked Android Jelly Bean 4.3 Firmware
- Download the root package from here and save the file on your computer.
- Place the file on desktop as you will need it in a second.
- Connect your phone with the computer.
- Use the USB cable for establishing the connection.
- Select the root package and copy paste or drag and drop the file from the PC to your smartphone’s SD card.
- Turn off your S4.
- Reach recovery mode.
- For recovery mode all you have to do is to press Power, Volume Up and Home buttons at the same time, until the recovery mode menu is being displayed.
- Select “wipe data factory reset”, “wipe cache partition” and “wipe dalvick cache”.
- Now, by using the recovery menu choose, or select “install zip from SD card” followed by “choose zip from SD card”.
- Pick the root package and flash the same.
- In the end, return to recovery and select “reboot system now”.
Friday, August 22, 2014
How To Install VRUCML1 Android 4 3 JB Firmware on Verizon Galaxy S3 SCH I535 Guide
Verizon Galaxy S3 SCH-I535 users VRUCML1 finally received the official Android 4.3 firmware update Jelly Bean. The firmware update is available as an OTA update and also can be downloaded for manual updates. This new firmware update may upgrade Verizon Galaxy S3 SCH-I535 from the official Android 4.1.2 to Android 4.3 Jelly Bean Jelly Bean. Continue reading this guide to learn how to get an official stock Android 4.3 Jelly Bean I535VRUCML1 firmware runs on Verizon Galaxy S3 SCH-I535. Almost all the possible ways to update your device to this firmware discussed here. One thing should be noted that the official firmware flashing or install kernel then restore root access you will fail, in short it will unroot it.
Warning:
This tutorial is only for Verizon Galaxy S3 SCH-I535. Don’t try this guide on any other Android device. Also, we are not responsible for any damage caused due to the instruction given in this page. Try this at your own risk. However, it is very unlikely that your device will be damaged if you follow all the instructions as it is which are mentioned in procedure.
Pre Requisites:
Though official firmware restore all existing data but we recommend to back up your data first before proceeding to avoid any uncomfortable situation such as bootloop fix.
1. Backup your device data. You can follow our ultimate backup guide.
2. Make sure your device have at least 60% battery power. You can install an app like Battery Notifier BT Free on your Android device to check it easily.
3. You already have USB Driver Installed for Verizon Galaxy S3 SCH-I535 in your PC. [Download USB Drivers]
4. Make sure USB Debugging is enabled otherwise you won’t able to transfer file between PC and Verizon Galaxy S3 SCH-I535. [Guide].
How To Update Verizon Galaxy S3 SCH-I535 via OTA
- First of all make sure you have stable internet connection (Wi-Fi or data network) on your device.
- Now, go to Android app drawer and then select Settings.
- Then locate About Device and tap on it.
- Next select Software update from About device screen.
- Then tap on Update option.
- You should see an update, press OK to download and install. (Remember, download using 3G or network data will incur additional charges to your phone bill!)
- Soon your device will reboot to complete the installation process.
If you see “The latest update have already been installed” massage while checking update then your device yet to receive an OTA update. Check back within few days or jump to next procedure.
How To Update Verizon Galaxy S3 SCH-I535 via Kies
- Make sure you have stable internet connection on your computer.
- Now download and install Samsung Kies on your computer.
- Turn on your device (if it off) and then connect it to computer with USB cable.
- Run Samsung Kies and wait for it to detect your device.
- You should see a New Firmware Upgrade is available at Samsung Kies home screen.
- Press the Firmware Upgrade button to proceed.
- Follow on screen instruction and soon you will see your device running upgrade and reboot automatically. Once done, you can disconnect your device from computer.
Again! If you see “This is the latest firmware” in Samsung Kies, then your device yet to receive the latest update on Kies. Its good time to go for manual update instruction that located below.
I535VRUCML1 Android 4.3 Jelly Bean Firmware Details:
- PDA: I535VRUCML1
- CSC: I535VZWCML1
- Download: I535VRUCML1 I535VZWCML1_VZW.zip
[Please Note: After flashing this firmware you will lost any installed custom ROM including CM10.2, AOKP, Avatar,Beanstalk, Omni ROM, Slim ROM, Pac-Man, Paranoid Android, LiquidSmooth or Carbon.]
How To Install I535VRUCML1 Android 4.3 Jelly Bean On Verizon Galaxy S3 SCH-I535 Manually
- Download Odin v3.09.
- Extract Firmware zip file that you downloaded earlier from above link, you will get a .tar.md5 file and some other files (optional).
- Extract Odin zip file and you will get Odin3 v3.09.exe along with few other files.
- Power off your Android device. Wait 5-6 seconds for vibration to confirm complete switch off.
- Now, put the Verizon Galaxy S3 SCH-I535 in Download Mode by pressing and holding down the Home &Volume Down button together while pressing the Power button. A warning screen will come up; press Volume Up button to enter Download Mode.
- Now run Odin3 v3.09.exe (see Step 3) as an Administrator because Admin privileges is required to complete the process smoothly (only applicable Windows Vista and higher).
- Now connect your device to your PC using USB cable. An “Added!!” massage will appear in Odin’s message box. If you don’t get the same then you should try another USB port (try USB port located in back in your desktop PC). If that too don’t work then you should reinstall the driver. If you successfully see the “Added!!” message in Odin then you are ready to go in next step. You should also see COM port with a number in Yellow if you successfully added your device.
- Click the AP Button, and select that .tar.md5 file that you get in Step 2. If you are using old Odin then add the file to PDA button.
- In Odin window, make sure only Auto Reboot and F. Reset Time checkboxes are selected.
- Double check everything that we mentioned in Step 8 & Step 9 above. Now, once satisfied hit the START button to begin the flashing process.
- Once flashing completed, your Verizon Galaxy S3 SCH-I535 will restart and soon you will see a PASS message with green background in the left-most box at the very top of the Odin. You can now unplug the USB cable to disconnect your device from computer.
Congrats! You just updated your Verizon Galaxy S3 SCH-I535 to Android 4.3 Jelly Bean firmware. Go to Settings > About device to verify this firmware update.
Fix Boot Loop Issue On Verizon Galaxy S3 SCH-I535
If Verizon Galaxy S3 SCH-I535 stuck at booting animation for more than 10 minutes after Step 11 then follow below instructions:
- Go to recovery mode. To do so, press and hold the Volume Up, Home and Power buttons together.
- Now perform Wipe data/Factory Reset and Wipe Cache Partition task before selecting reboot system now function. In recovery mode use Volume keys to navigate between options and Power key to select the option.
Please note, performing wiping task will erase your device internal memory data and not external SD card data.
That’s it! Let us know about your latest Android 4.3 Jelly Bean experience.
Sunday, August 17, 2014
Tuesday, August 12, 2014
Download latest ZhuoDaShi version 3 6 0 1015 Tablet Firmware About Tablet
ZhuoDaShi is a pretty good chinese rooting software for Android devices. It reaches now the 3.6.0.1015 number version. The program is actually written in Chinese so it will look odd on your PC, however I’ll show you exactly what needs to be clicked and when.
Download ZhuoDaShi version 3.6.0.1015 from here, here or here. Install ZhuoDaShi. Although the program is in Chinese it should be fairly obvious what you need to press to install it.The easiest way to put your tablet download mode
Friday, August 8, 2014
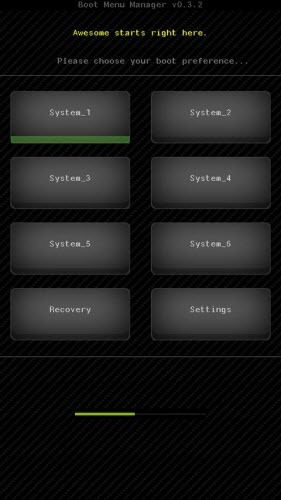
How To Using BMM 0 3 4 on Motorola Atrix 2 MB865 ME865 –Video Tutorial Guide
Due to locked bootloader issue in Motorola Atrix 2 installing CWM recovery or TWRP recovery through regular process isn’t possible. We have to find alternate solution such as BMM. We know that a custom recovery such as CWM recovery or TWRP recovery is required to flash custom ROMs. The latest BMM aka Boot Menu Manager comes with CWM recovery which let you flash various custom ROMs. We at Android Pulp already covered few custom ROMs including 4.4.2 KitKat and 4.3.1 Jelly Bean. We all know official Motorola Atrix 2 for now can only be updated to ICS, hence custom ROMs are only option to try out latest Android OS.
So, BMM is a very important app to have on your Motorola Atrix 2. Just like SafeStrap app which you probably used in your Motorola device already, you need little knowledge before you start using this tool to flash ROMs and other utility. XDA member arnab came forward and shared this fine video tutorial to help out all Motorola Atrix 2 users.
Download Boot Menu Manager from Play Store: Here
So, BMM is a very important app to have on your Motorola Atrix 2. Just like SafeStrap app which you probably used in your Motorola device already, you need little knowledge before you start using this tool to flash ROMs and other utility. XDA member arnab came forward and shared this fine video tutorial to help out all Motorola Atrix 2 users.
Download Boot Menu Manager from Play Store: Here
Related Article:Get Android 4.4.2 KitKat PAC-man ROM For Install Motorola Atrix 2 –How To Guide Using Odin
In the fist part of this video tutorial, you will learn how to upgrade your Motorola Atrix 2 to Android 4.0.4 ICS from Android 2.3 Gingerbread. And in second part, you will learn how to root Motorola Atrix 2 and install BMM as well as how to use BMM or Boot Menu Manager to flash custom ROMs. He also explained multiboot and shared many important tips that surely help you out while flashing.
Tutorial Part-1
I hope, this video tutorial give you a decent knowledge about BMM. So happy flashing! [source]
Subscribe to:
Posts (Atom)